- webLuxDoor
- Description of screens
# Description of screens
This chapter describes the elements and functions of each screen.
# Arrival and departure
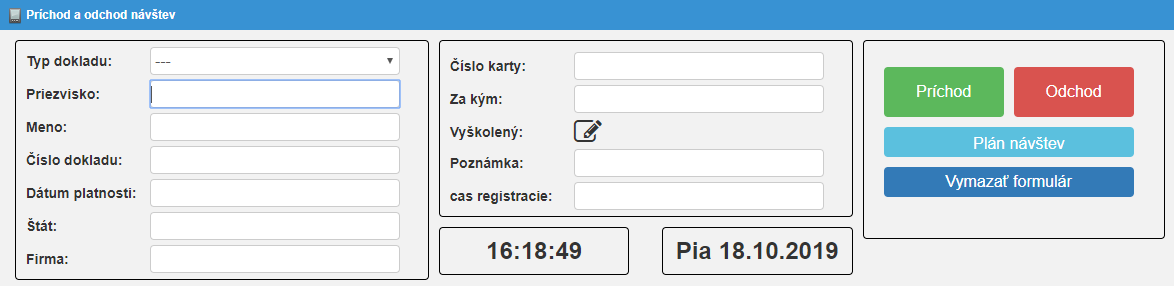
The Arrival and Departure screen is used to record the arrival and departure of the
visitor. It is enough for the doorman to work only with this window.
# Elements on the page
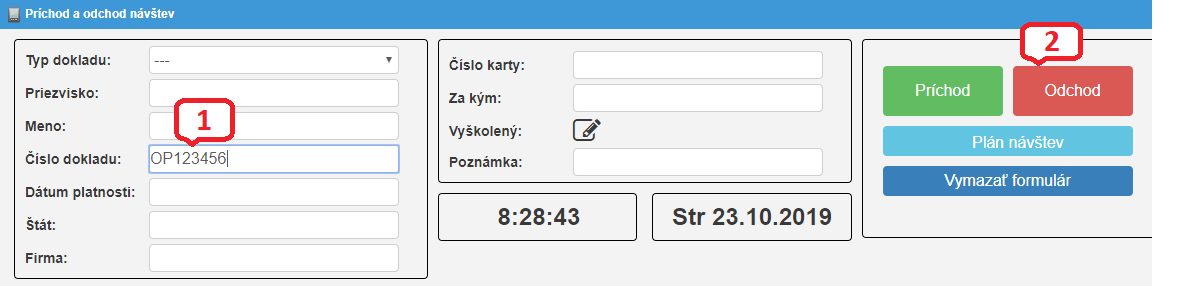
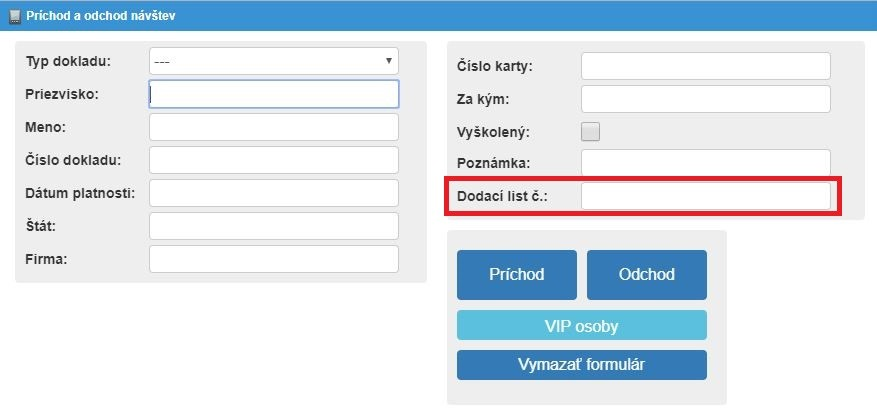
Screenshot of Arrival and Departure.
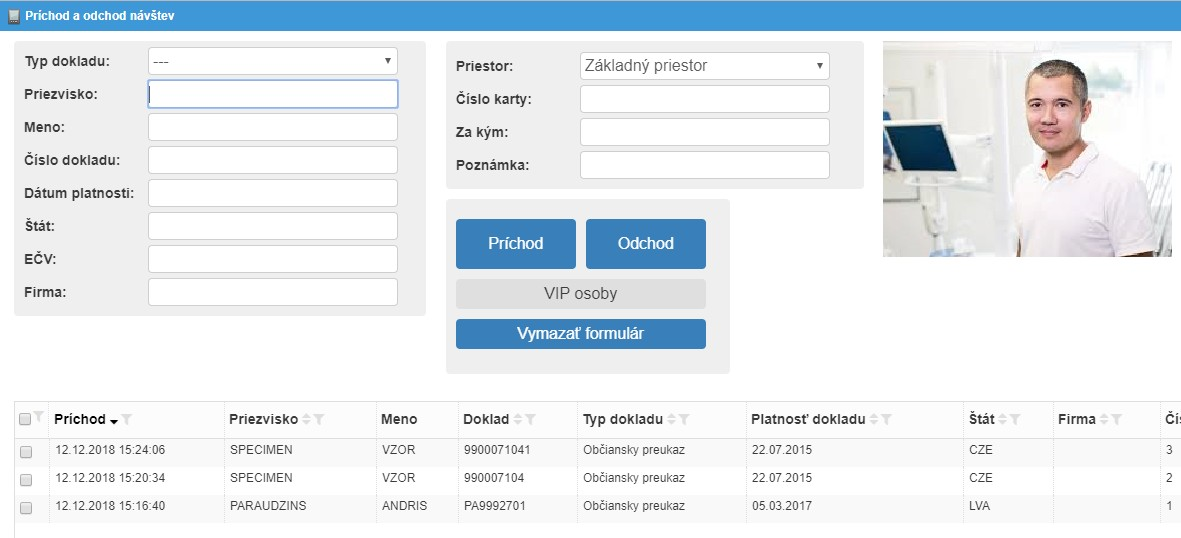
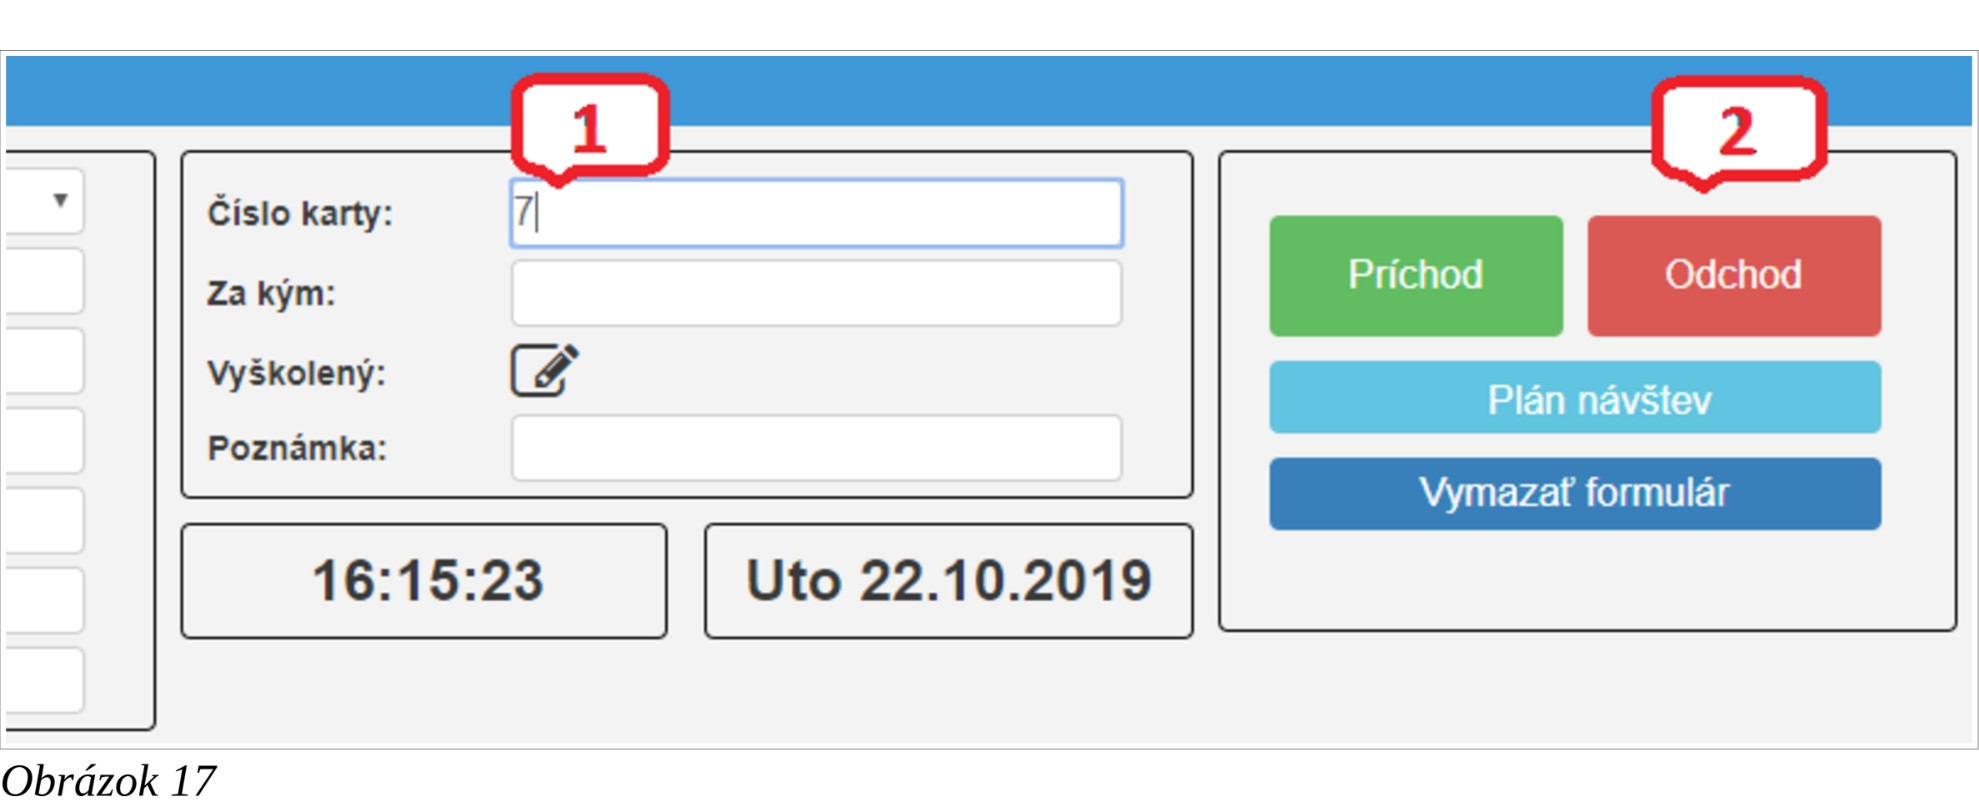
The following information can be entered for each visit
| Title | Type | Title | Type |
|---|---|---|---|
Document type |
Selection box | Space *** |
Check box |
Last name * |
Text box | Card number ** |
Number |
Name |
Text box | For whom ** |
Text box |
The document number ** |
Text box | Trained *** |
Check box or Button |
Expiration date |
Date | { field name 1 } **** |
Text box |
State |
Text box | { field name 2 } **** |
Text box |
LPN |
*** Text box | { field name 3 } **** |
Text box |
Company |
Text box | { field name 4 } **** |
Text box |
Note |
Text box | { field name 5 } **** |
Text box |
Control elements
| Title | Type | Title | Type |
|---|---|---|---|
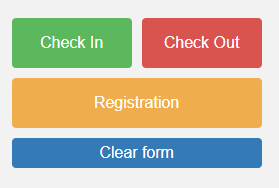
Check In |
Button | Clear form |
Button |
Check Out |
Button |  |
Button *** |
Registration |
Button | Automatic gate *** |
Check box |
VIP persons |
Button *** | Open the gate *** |
Button |
Schedule of visits |
Button *** |  |
Button *** |
Other elements
| Title | Type | Title | Type |
|---|---|---|---|
Photo of the visit *** |
Photo | Photo of LPN *** |
Photo |
Table of present visits |
Data |
* Mandatory
** Whether the data will be mandatory is set in Settings
*** Whether the element will be accessible is set in Settings
**** Whether the data will be mandatory, whether the element will be accessible
and the name of this field is set in Settings
# Using the Arrival and departure page
The Arrival and departure page is primarily intended for the person receiving visits to
the company's gatehouse (doorman). The doorman fills in the form fields (eg
Surname, First name, Document number, Whose visit is, Visiting card number, etc.)
from the document (manually or using a document reader) submitted to him by the
person visiting the company. If it is necessary for a person to sign the entry document
authorizing entry, it is necessary to record the visitor's signature with a signature pad.
After submitting the form (see below), the person's arrival is recorded in the system.
If the visit was planned, it is possible to send a notification e-mail and / or SMS
message to the employee to whom the visit came. When the visitor leaves the
company, the doorman marks the departure (see below).
Recording the arrival of the visit
It is necessary to fill in the form with information about the visit (eg surname, name, document number, the visit, number of the visiting card and others). It is possible to fill in the form
- Manually
- Automatically using the DESKO Identy CHROM reader
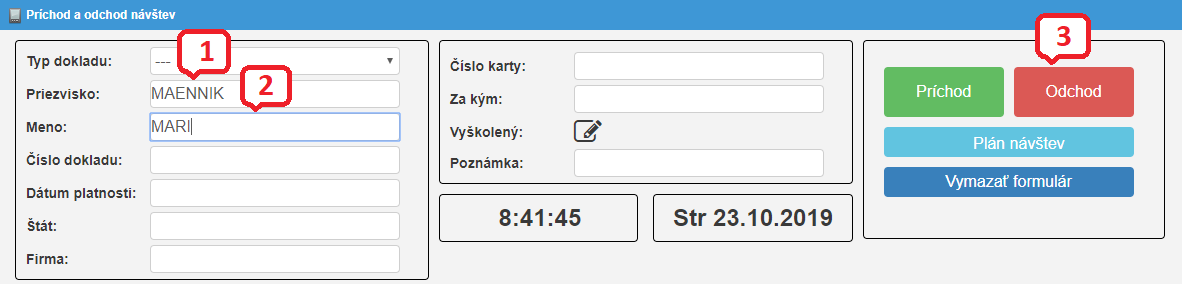
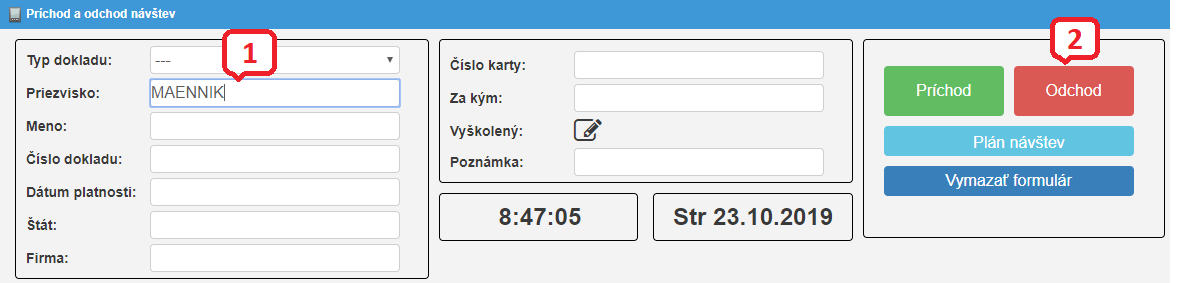
- By selecting a visit from the list of periodic visits (VIP persons). The list is
called up after typing at least one letter in the
Last namefield, or by pressing theVIP personbutton
The data form will then be submitted
- Manually by pressing the
Check Inbutton - Automatic - this option is only possible when using the "DESKO Identy
CHROM" document reader. The automatic method of submitting the form is
turned on in
Settingsby selectingAutomatically submit the form after document read. This method of submitting the form is used only in exceptional cases
Registration of visits
Sometimes it suits the doorman the possibility that he registers the visit in advance in
the system and only later marks the entrance to the company. For example, the truck
is waiting to be called to enter the area, or the visitor first learns the instruction, gets
acquainted with the entry rules, signs the necessary documents, etc. The actual entry
of the visit to the area will take place later. In this case, the arrival is not marked, but
the registration, by clicking on the Registration button
Subsequently, when the visitor is invited to enter the area, the arrival of a pre- registered visit will be marked. The arrival of a registered visit can be marked in several ways:
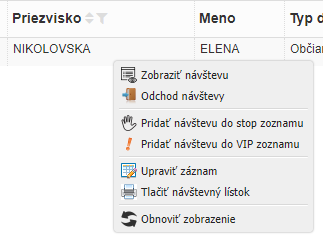
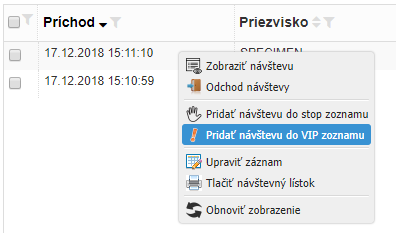
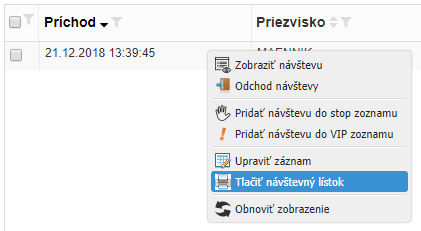
1 ) Call up the context menu in the list of present visits. The "Arrival of the visit" option will be present in the context menu. Selecting this option records the entry of the visit.
2 ) Double-click on the person to load the data into the form. Now just click on the
Arrival button.

3 ) In the field "Card number" write the card number that the visitor received during
registration. The application loads the registered person (before the person's name is
the text “* Reg-”). By clicking on the found record, the data is loaded into
the form. Now click on the Arrival button.

Note
Above the list of present visits there is a selection field where the doorman can filter the list of present visits- Registration + Arrivals
- Registration
- Arrivals

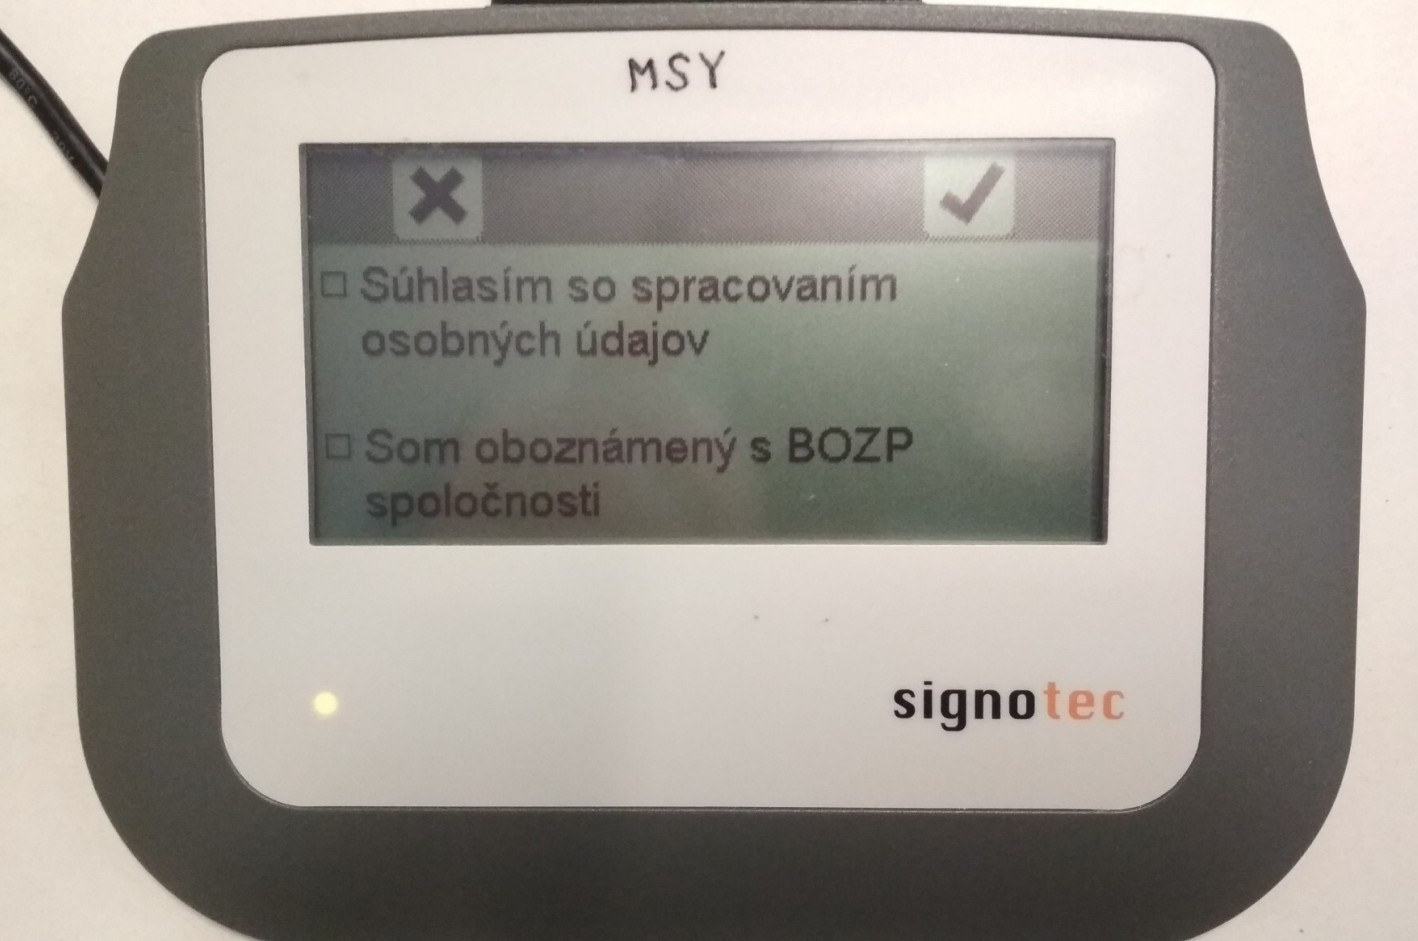
Signing of entry documents
If the Mandatory training (Confirm the training with a signature) option is activated
in the settings, then the visitor is required to sign the necessary documents. A window
will open and at the same time a signature pad will be activated, on
which the visit will be signed, thus confirming familiarity
with the rules (eg health and safety) of entering the company's premises. For more
information on signature pad settings, see section 3.9.5 Signature pad tab.
Note
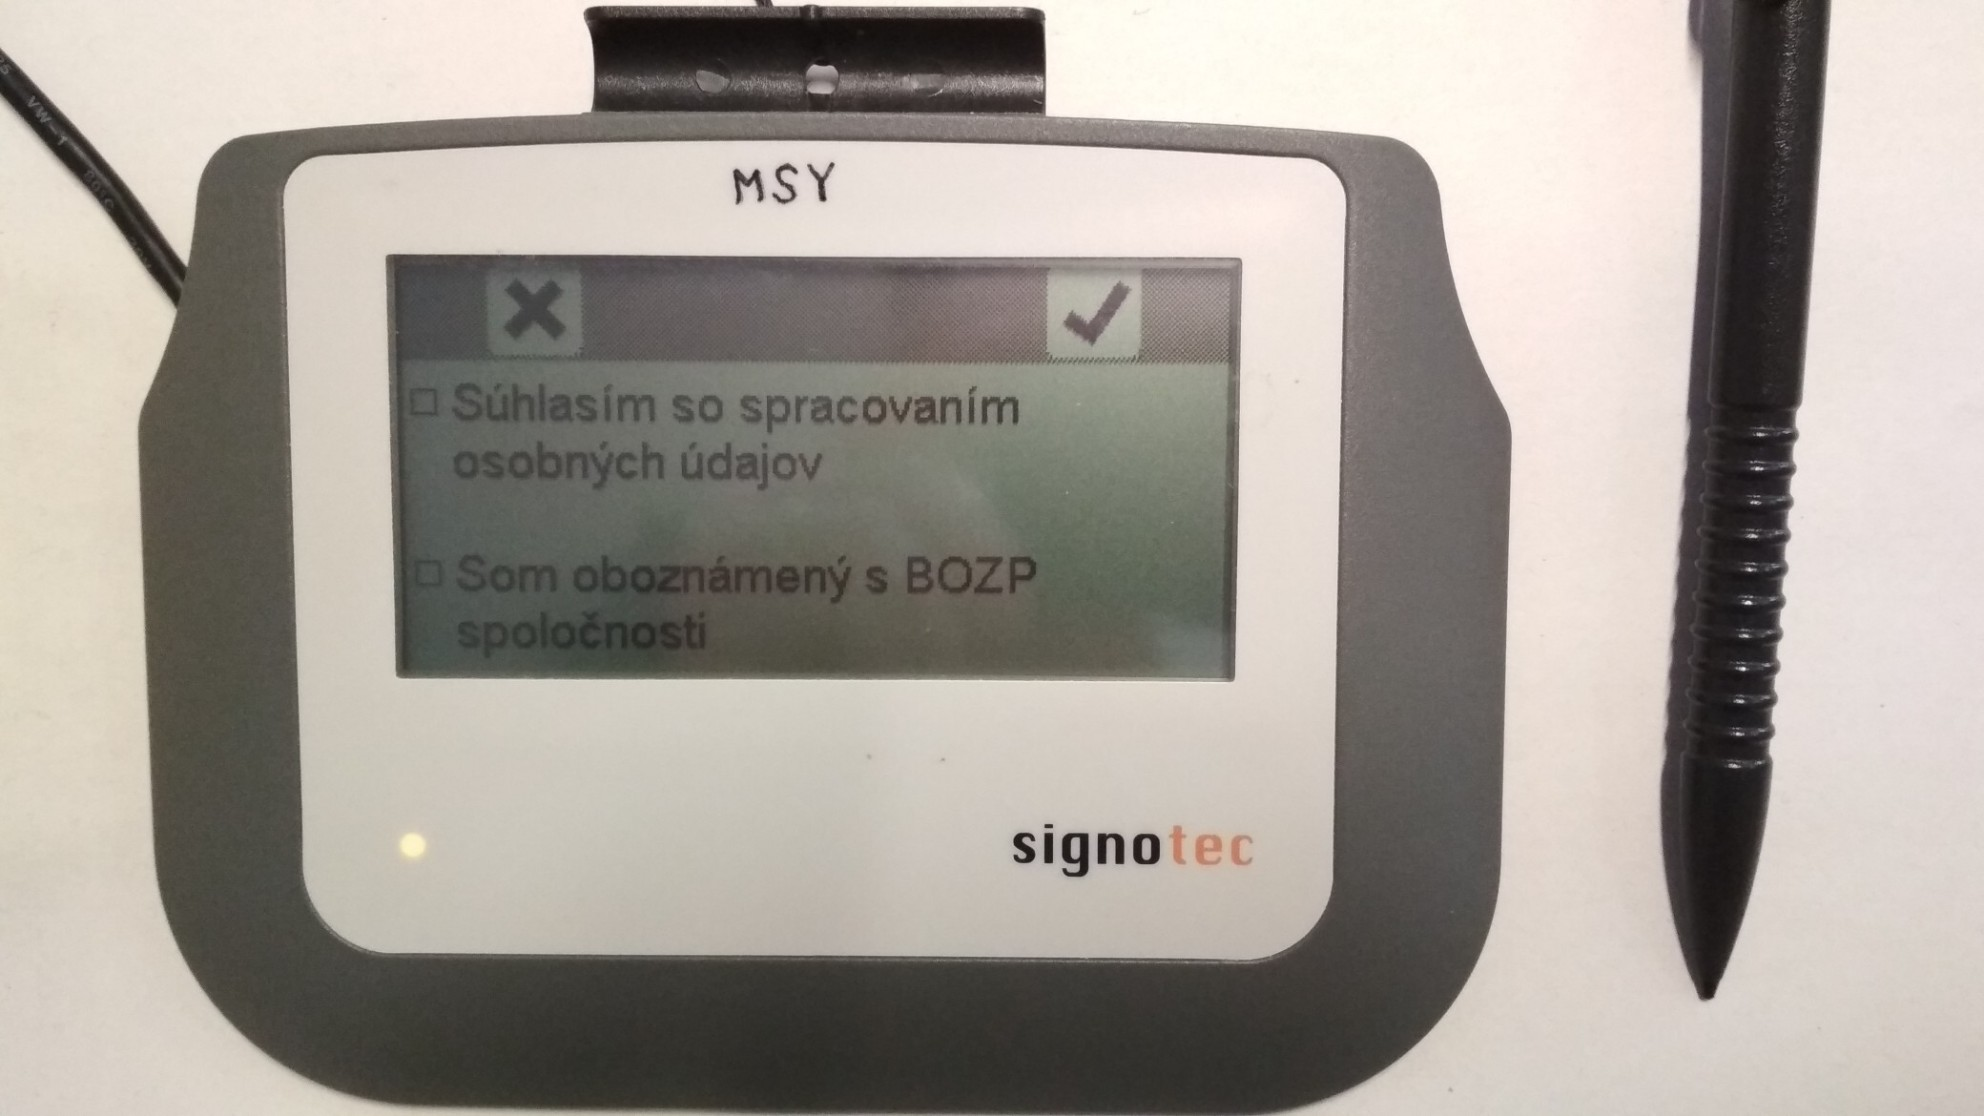
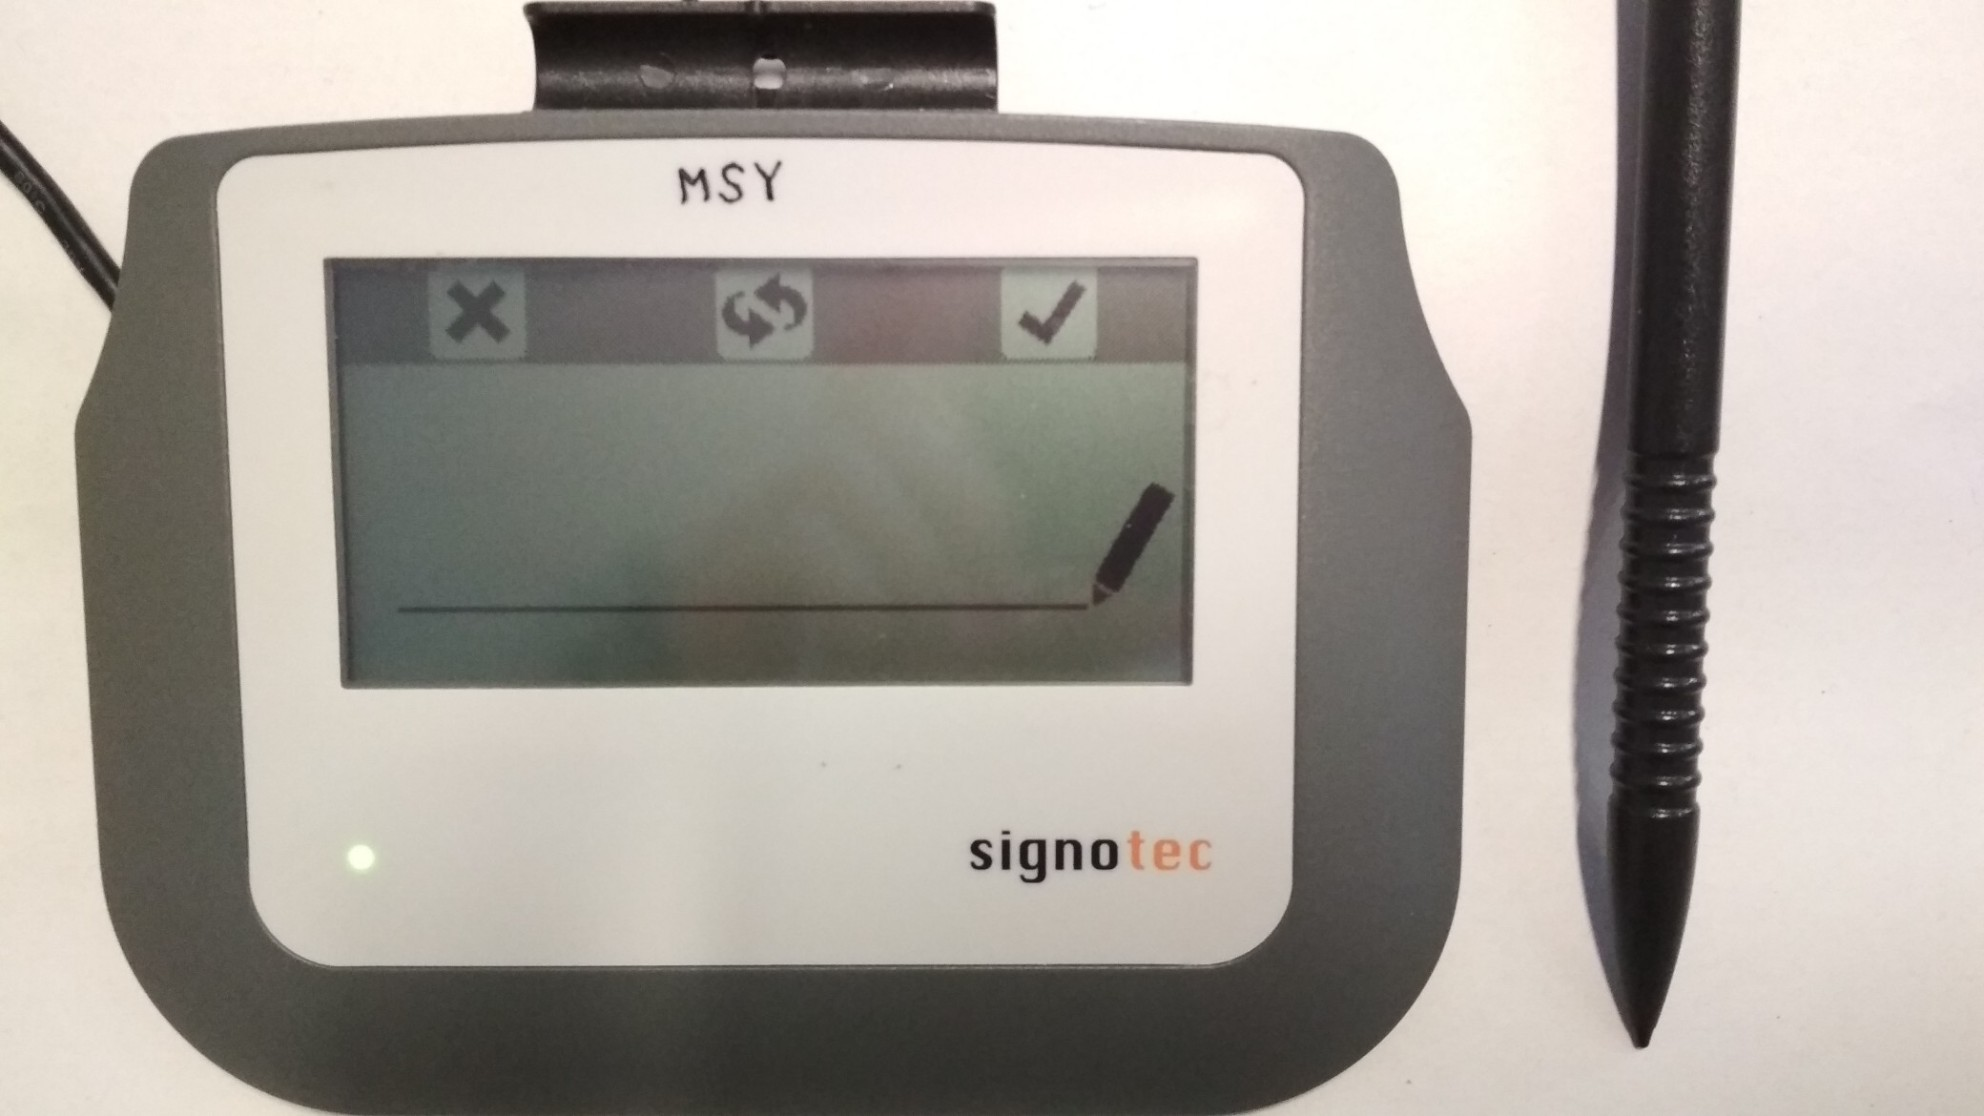
The procedure for signing differs slightly for different types of signature pads.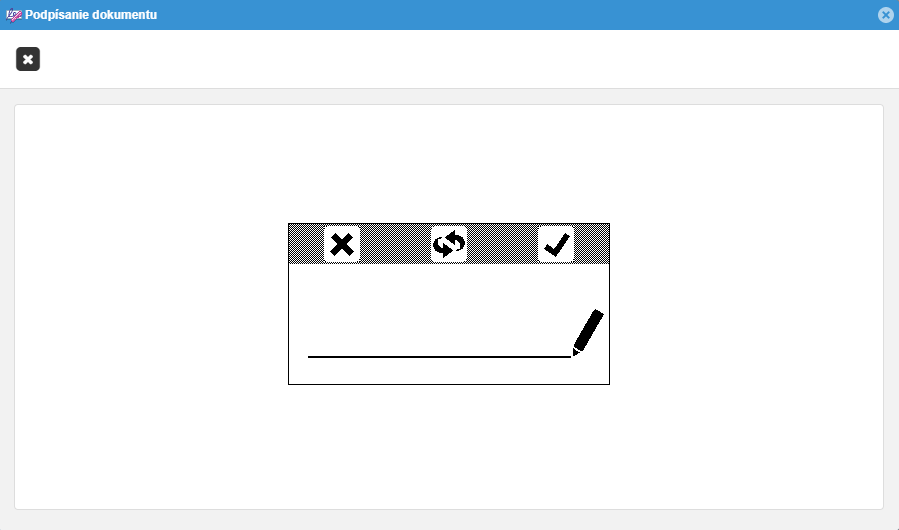
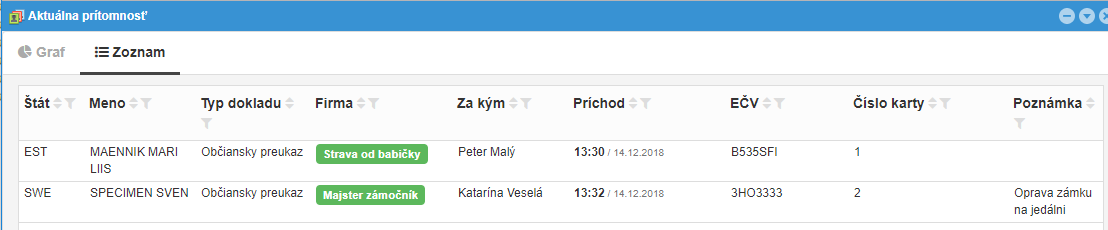
Overview of present visits
The list of visits present in the area is at the bottom of the screen.

Recording the departure of the visit
The departure of the visit can be done in the following seven ways:
- The doorman enters the number of the visiting card in the
Card numberfield and clicks theCheck Outbutton
- The doorman fills in the form by dragging the document through the swipe
document reader DESKO Identy CHROM and presses the
Check Outbutton - The doorman fills in the
Document Numberand presses theCheck Outbutton
- The doorman fills in the
Last Name,First Nameand presses theCheck Outbutton
- The doorman fills in the
Last Nameand presses theCheck Outbutton
- The doorman retrieves the person's information into the form either
a) by double-clicking on the line at the bottom of the screen
b) right-click on the line with the given person and select the
Show visit
option in the context menu
By pressing the Check Out button, the departure will be marked in the
system and the person will no longer be in the list of present visits.
- Right-click on the line with the person and select the option
Check Out of visitorin the context menu
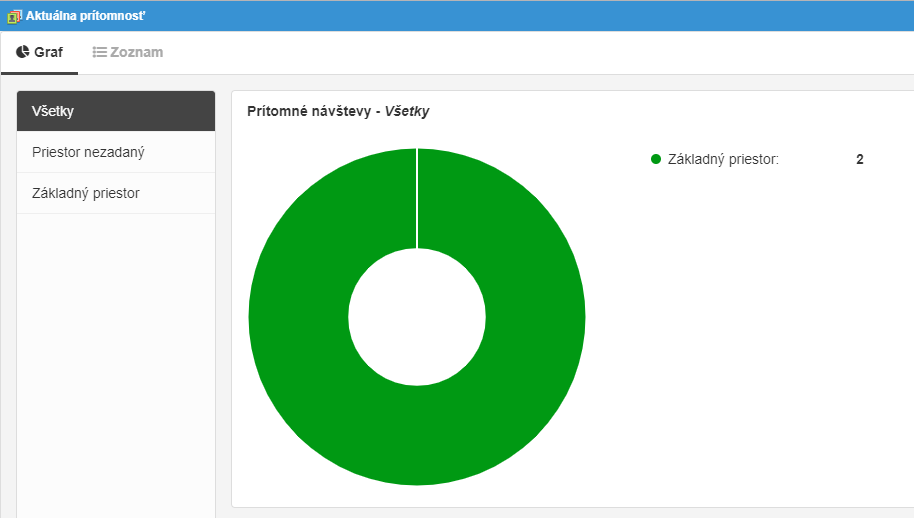
# Actual presence
The Actual presence screen displays an overview of present visits:
- in the graph
Values are displayed for each room
- Present visits
- Departed visits
- Average visits (Average visits per day in the last week)
- in the table.
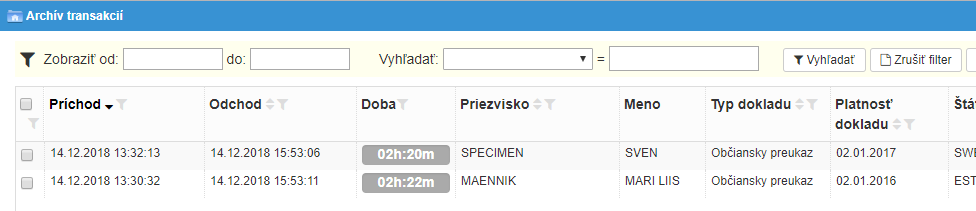
# Archive of transaction
The window displays an archive of visits that have already been departured, i.e. present visits are not shown.
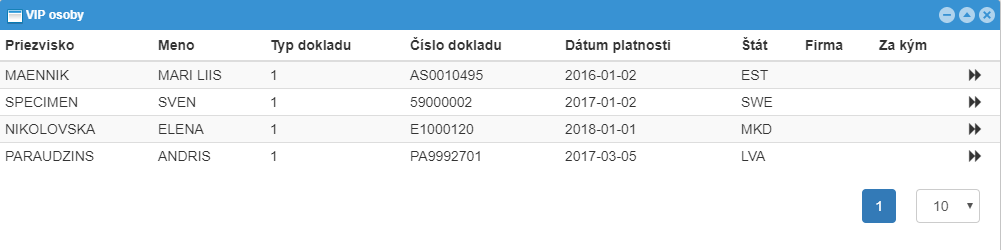
# VIP persons
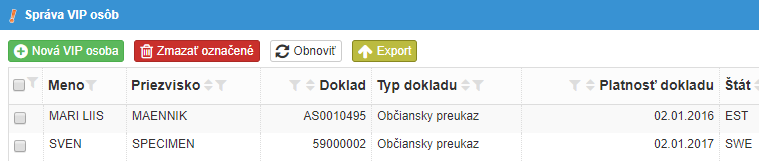
Each person who visits the company is recorded in this table exactly once, i.e. even recurring visits are stored once in this table. It is not necessary to add people to this table manually . You can add people to this table:
- Manually, by clicking on the "New VIP person" button
- By selecting the "Add visitor into VIP list" option from the context menu on the
Arrival and departurescreen. The context menu is displayed by right-clicking on the person at the bottom of the screen - Automatic. In this case, the VIP person table is essentially "maintenance free". Automatic saving is set in Settings -> Check in of visitor -> Automatically save to VIP
If some visitors have been assigned a permanent visiting card, then the number of this card must be manually assigned to the visitor in this table.
Note
If you use the training module and the validity of the training is monitored, it is necessary to have the automatic mode of inserting into the VIP table switched on.# Stop persons
Use the screen to add unwanted people. You can add people to this list:
- Manually by clicking on the "New stop person" button, see section 3.5.1 Manually add a person to the Stop list
- Select "Add visitor into stop list" from the context menu on the
Arrival and Departurescreen. The context menu is displayed after right-clicking on the person at the bottom of the screen

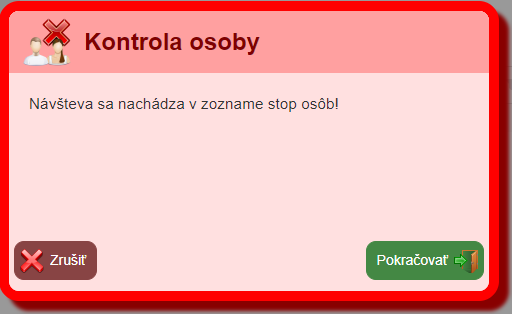
When visiting a person who is in the Stop list, a warning window will appear to the
doorman.
# Manually add a person to the Stop list
On the Administration of blocked persons screen, click the New stop person button.
For the function of automatic search for a person in the stop list, it is necessary to fill
in the following fields correctly:
a) if the option "Document number has to be specified" is checked (see section
3.9.1 Check in of visitor tab)
▪ Document number
▪ Document type
▪ State
b) if the option "Document number has to be specified" is not checked
▪ Name
▪ Last name ▪ Document type ▪ State c) "Stop person type" must be selected Optionally, you can fill in "Start date" and "End date". A person will be searched in the "Stop persons" list only if the current date falls within the period of validity of that stop person.
# Visit areas, Areas types
It is possible to define different company premises and to fill in the Area where the
visitor will go when the visitor arrives.
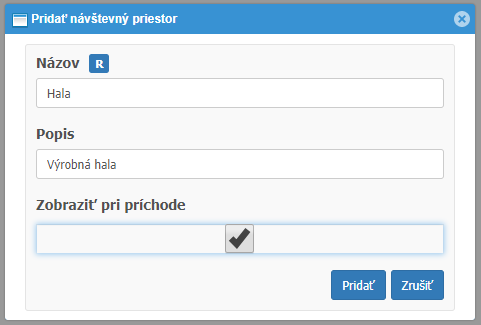
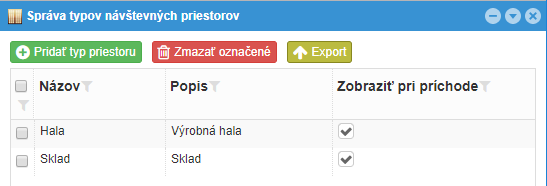
On the Areas types screen, enter the appropriate room types.
For example, we will insert two types of area.
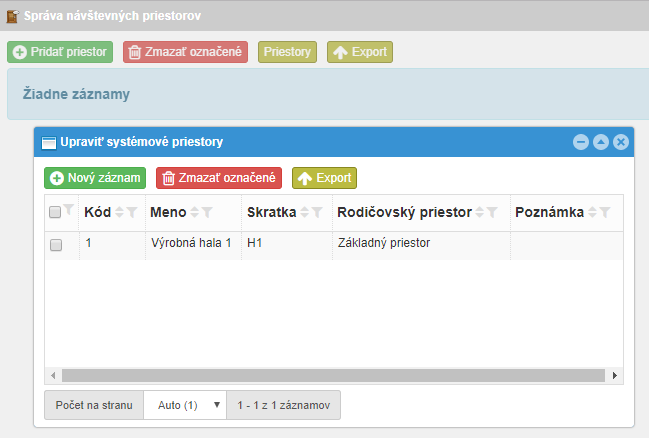
Next, on the Visit Areas screen, we will first add system areas. Click the Areas button.
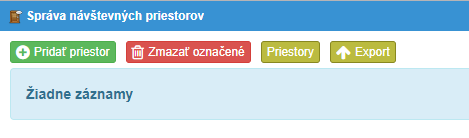
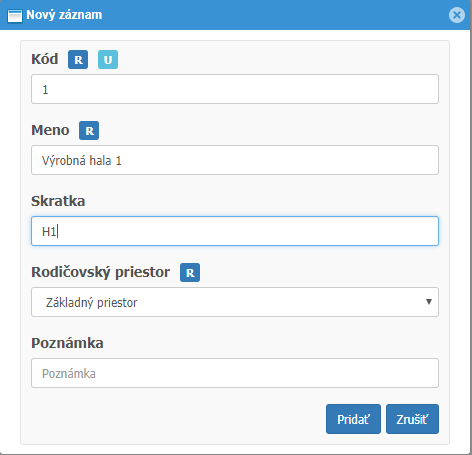
Add the appropriate area name, e.g. "Production hall 1"
We will now add the visiting area to the Visit areas screen. Click the "Add area"
button. Add area by selecting a menu from predefined areas, e.g. as in Figure.
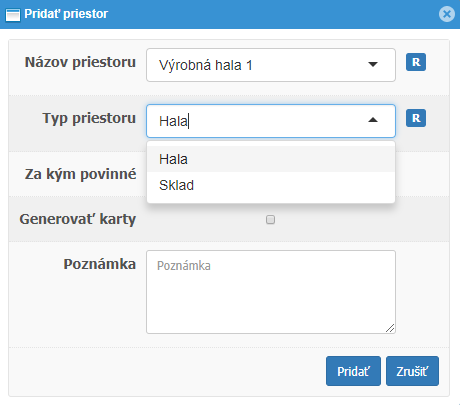
Add more visiting areas in the same way.
Now the doorman has the option on the Arrival and Departure screen to select in
which Business area the visit will go.
Note
Access to the entry of the areas must be enabled in Settings -> Check in of visitor -> Enable visit area assignment.# Countries
The Countries screen is used primarily to set the country's visa requirement. 208
tables are preset in the table. If they are not uploaded in the table, you can upload
them by clicking on the buttons Countries -> Import of countries -> Set default.
Additional states can be added by clicking the New country button. If the given state
has the value Visa requirement set to one of the following options:
- Visa required except biometric documents
- Visa required
- Visa obligation unknown thus, when entering such a person into the visit system, the following warning message will be displayed (the text of the message will correspond to the text of the visa requirement).
Note
The state visa requirement check must be enabled in the settings.Settings -> Document verification -> Verify visitor`s country.Settings -> Document verification -> Check the visitor visa requirement.If only the option
Verify visitor`s country is enabled, then only the country will be
checked in the list of countries, but not the visa requirement.# Groups of access rights
Each user of the system can be assigned different permissions, e.g. read, create, edit, and delete records. Also, some options may be completely inaccessible to him. Groups are used for this. Groups with different access permissions are created. A group of rights is then set for each system user. For example, in figure below, 3 permission groups are created.
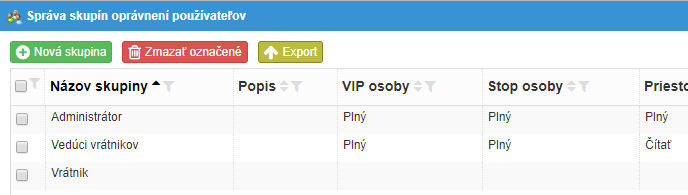
After logging in to the system, the doorman sees only some of the options as in figure.

Note
Users are assigned a group of permissions inSystem -> Access rights.# Settings
Description of individual setting options:
# Check in of visitor tab
| Option | Example |
|---|---|
Guest cards |
|
| Card number has to be specified |  |
| Card reader connected | |
| Show read card button | |
| Document number has to be specified | |
| Save personal identification number | |
| Extend the Stop List by checking the birth | |
| number | |
| For Whom has to be specified The value of For whom from the list only | |
Automatically fill up the form |
|
| Lastname | |
| Country | |
| Company | |
| For whom | |
| Guest cards | |
| Only run a search if the Last Name field is | |
| blank | |
| Automatically save to VIP | |
| Access to VIP persons table | |
| Planning of visits | |
| Visits approval | |
| Automatically find a person on your visit | |
| schedule | |
| Send notification email | |
| Notification email from | webluxdoor@dochadzka.top |
| SMS notification | O2 SMS Connector |
| When the visitor arrives | |
| SMS gateway URL | url |
| Key | 1234 |
| Credit | Button |
| Request a credit [EUR] | Button |
| Enable car identification assignment | |
| Enable visit area assignment | |
| Enable visitor photo | |
| Save photo to | Disk |
| Photo height [px] | 360 |
| Print visit ticket | |
| Automatically print visit ticket | |
| Text in ticket's header | Apis s.r.o |
| Text in ticket's footer | Return the ticket on departure |
| Mandatory training (Confirm the training with a | |
| signature) | |
| For everyone | |
| Allow untrained persons to enter | |
| Automatically open the signature dialog | |
| MRZ reader connected | |
| Automatically submit the form after document | |
| read | |
| Show time and date | |
| Also show today's outgoing visits | |
Gatehouses |
|
| Filter transactions by gatehouse | |
| Strict gatehouse mode | |
| Gatehouse setup according to the | Workplace / computer |
Card number has to be specified
If the option is enabled, the doorman must fill in the Card number field - it is the
number of the visiting card that the visitor will receive upon entering the building.
Card reader connected
If the option is enabled, it is possible to fill in the Card number field by reading the
card using a reader. Card reading can be activated by placing the cursor in the box, or
by pressing the icon next to the box (depending on the settings, see "Show read card
button" bellow). The translation table is used: System -> Cards. When importing a
CSV file, the file has the format:
PK_;SYS_CARDTYPE_PK_;CARDNUM;CARDNUM_OUT;STATUS;DATE_FROM;DATE_TO;SYS_USER_PK_;DESCRIPTION;
;Proxy;1234567890;55;Priradená;"01.01.2000 00:00:00";"01.01.2099 23:59:59";;;
Show read card button
If the option is enabled, an icon will appear next to the Card number field, which will
help the application prepare to read the visiting card.
Document number has to be specified
If the option is enabled, then the doorman must fill in the field Document number that the visit will submit, e.g. ID card, passport or other number.
Save personal identification number
If the option is enabled, the birth number (identification number) read from the document is stored in the database.
Extend the Stop List by checking the birth number
If the option is enabled, the 3.5 Stop persons list is extended by the "Personal Identification Number" (PID) field. In this case, the visit is searched in the list of Stop Persons also by birth number or PID.
For Whom has to be specified
If the option is enabled, then the doorman must fill in the field For Whom - i.e. the
name of the person responsible for the visit.
The value of For whom from the list only
AIf the option is enabled, then the value in the For Whom field can be selected only
from the offered listbox, i. it is not possible to enter any value.
Automatically fill up the form
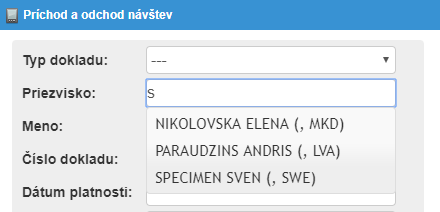
Lastname
If the option is enabled, then after entering the initial letters in the Lastname field,
the corresponding persons will be searched from the table of periodic visits (VIP persons) and will offer a list of matches. The doorman can select the person from
the list, while other fields will be filled in automatically.
Country
If the option is enabled, after entering the initial letters in the Country field, the
system will offer a narrower selection of countries.
Company
If the option is enabled, after typing the initial letters in the Company field, the
system will offer a narrower selection of companies.
For Whom
If the option is enabled, then after typing the initial letters in the Form Whom field, the system will offer a narrower selection of names.
Guest cards
It is possible to assign a visiting card to regular visits, which they will always use
when entering the company's premises. If the option is enabled, it is enough for
the doorman to fill in the Card number field, then select the offered person and
press the Check In button. This will speed up the visitor's equipment.
The visiting card must be entered for the visitor in the VIP persons window, see
3.4 VIP persons.
You may need to turn off the option in your web browser settings: Settings ->
Autofill -> Save and fill payment methods.
Only run a search if the Last Name field is blank
If the option is enabled, the above-mentioned method will search for a person by
Card number only if the Lastname field is empty. This is so that the completed
form is not overwritten.
Automatically save to VIP
If the option is enabled, the visit will be automatically saved in the list of periodic
visits (VIP persons). Next time, the doorman will be able to extract the person's data
from this table. If visits also need to be trained and the training can be valid for a
longer period (eg one year), it is necessary enabling this option.
Access to VIP persons table
If the option is enabled, the VIP persons button will be shown on Visits arrival and departure window. The doorman can thus search in the list of periodic visits and double-click or click on arrow to fill in the visit details.
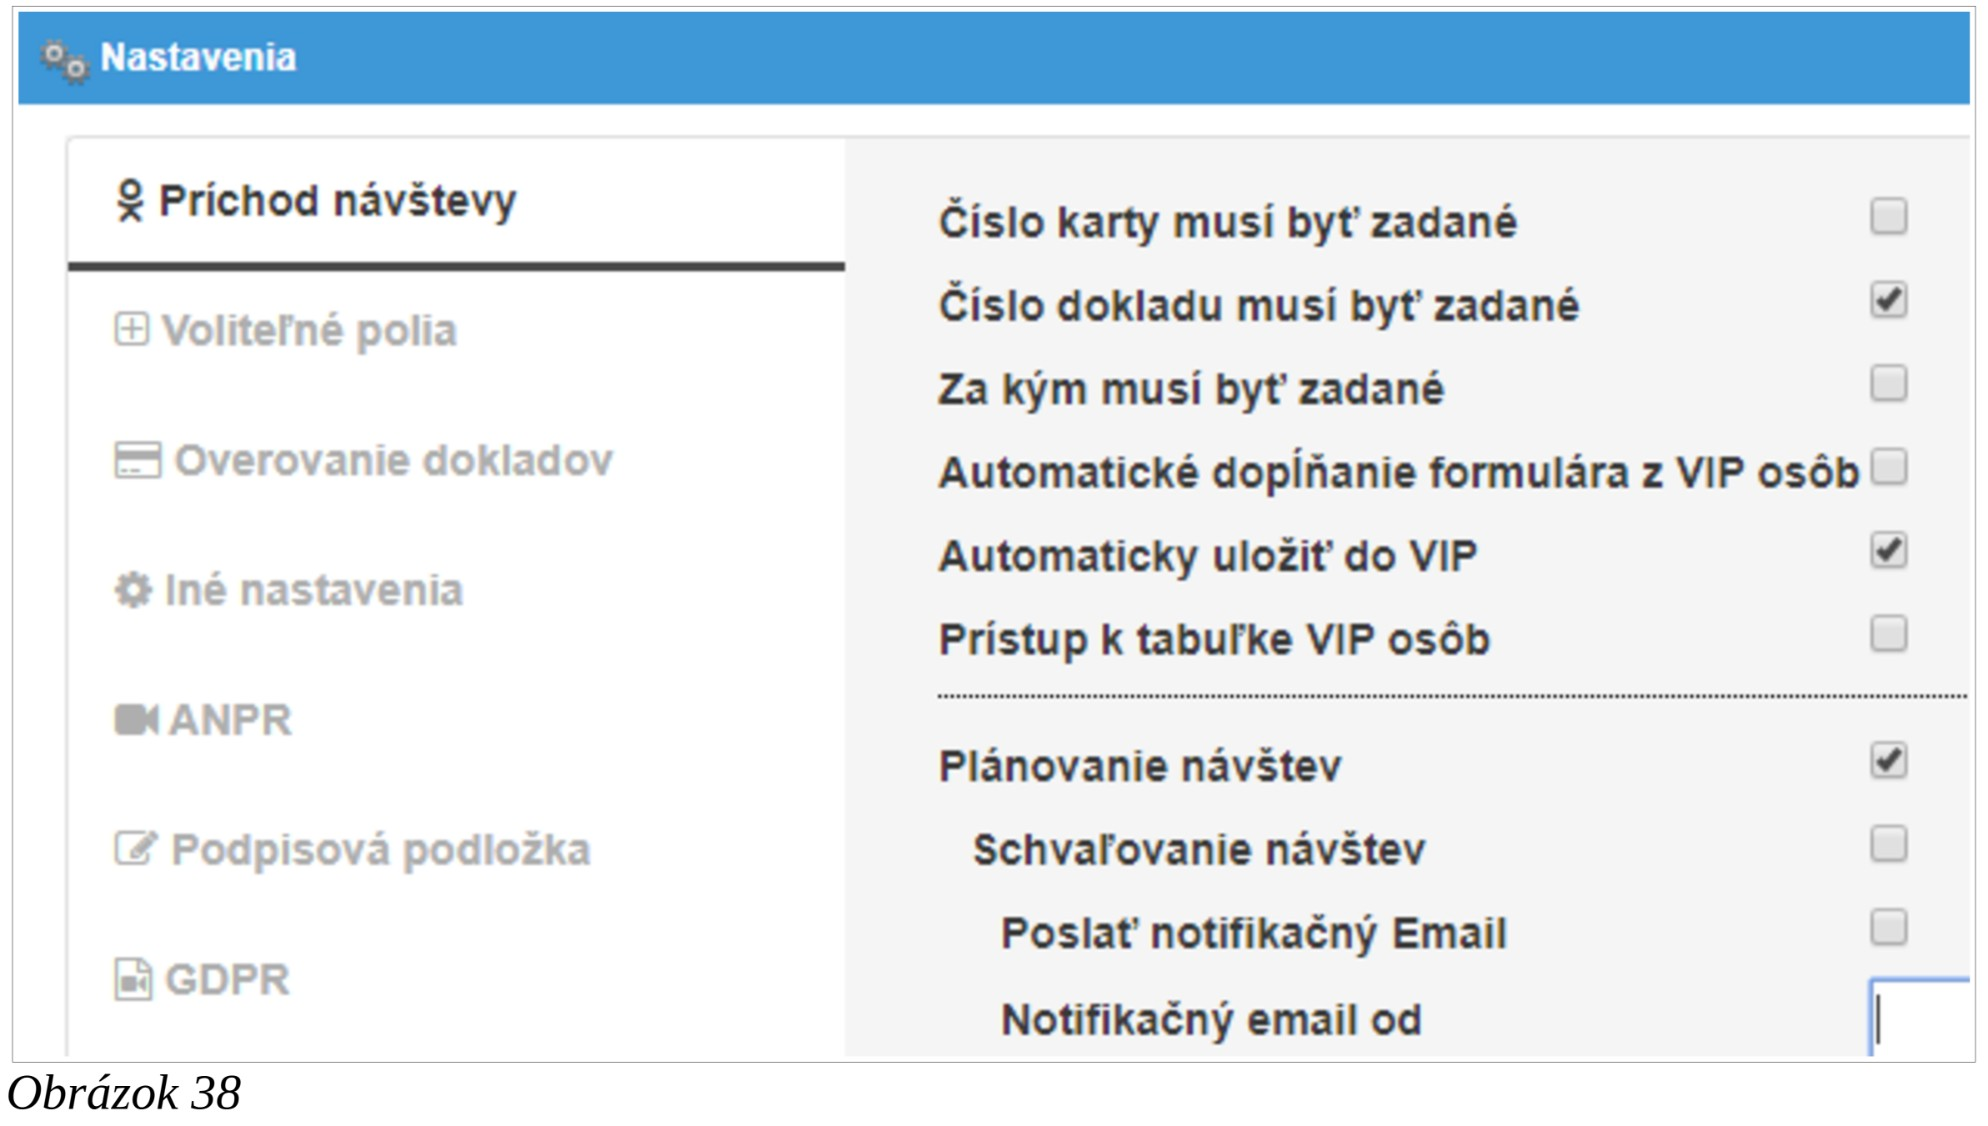
Planning of visits
If this option is enabled, the Schedule of visits button is available on the Arrival and departure screen. The doorman has the opportunity to check whether the
visit was planned in advance.
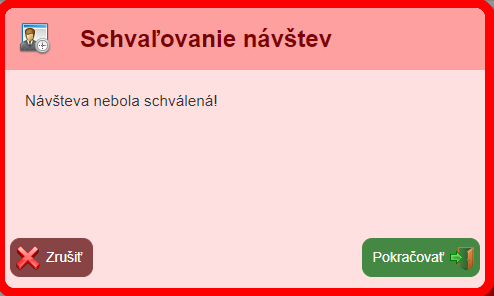
Visits approval
If this option is enabled, the doorman has the option to verify that the arrival of the visit has been approved. In addition, in case that visit was not planned, the doorman is warned by the message.
Automatically find a person on your visit schedule
If the option is enabled, then after reading the document by the document reader, or after selecting a person from the list, a search for a person in the list of scheduled visits is performed.
Send notification email If the option is enabled, then when planning a visit, the approver will receive a notification e-mail about the need to approve the visit.
An e-mail will also be sent to the employee visiting the visit when the visit arrives.
Notification email from
A place to fill out an email address that will be listed as the sender of the notification email.
SMS notification
The sending of notification SMS is switched on / off.
When the visitor arrives
If the option is enabled, a notification SMS is sent to the visited person upon the arrival of the visit.
SMS gateway URL
Setting the URL of the SMS gateway provider.
Key
Setting the customer key.
Credit
Checking the amount of the currently prepaid credit for sending SMS messages.
Request a credit [EUR]
The IBAN, VS information required to top up the credit is displayed.
Enable car identification assignment
If the option is enabled, the Car number field will be displayed on the Arrival and departure screen, in which the doorman will write the registration number of the
vehicle on which the visit enters the building. When using an LPN recognition
(license plate) camera, this field will be filled in automatically if the camera recognizes the license plate.
Enable visit area assignment
If this option is enabled, the Area field will be displayed on the Arrival and departure
screen. The doorman selects from the offer the place of the company where the visit
will go.
Enable visitor photo
If this option is enabled, it will be possible to save a photo of the visitor. The Arrival and departure screen displays video from a webcam connected to your computer. The photo is saved the moment the doorman presses the Check In button. You can select the storage location of the "Database" or "Disk" photo. You can also adjust the size of the image in pixels.
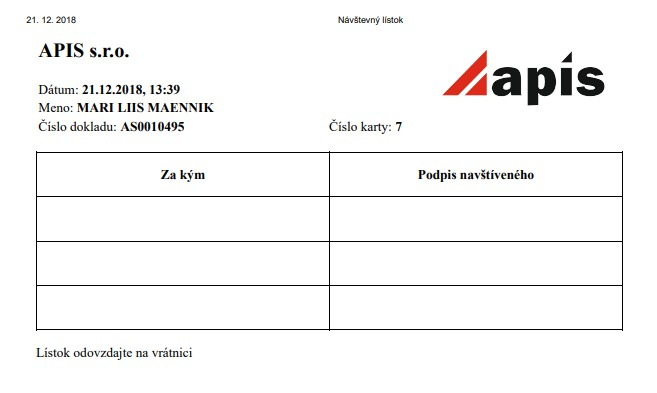
Print visit ticket
If the option is enabled, it will be possible to print a visitor's ticket for the visit. The role of the visitor's ticket is that the visitor can sign it for the employee to whom the visitor is coming.
After activating this option, the related settings are expanded:
| Title | Example |
|---|---|
| Automatically print visit ticket | |
| Text in ticket's header | Apis s.r.o |
| Text in ticket's footer | Hand in the ticket at the reception |
It is possible to print a visitor's ticket:
- manually by clicking on the option "Print visitor's ticket" from the context menu, which is activated by right-clicking on the visit
- automatically (if the option "Automatically print visit ticket" is enabled), after
clicking on the
Check Inbutton. - automatically (in case the option "Automatically print visitor ticket" and the option "Automatically submit the form after document read") is switched on after swiping the document through the slot document reader DESKO Identy CHROM.
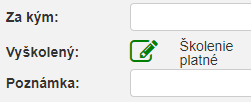
Mandatory training (Confirm the training with a signature)
The choice serves to confirm that the visit was trained to move on the company's
premises, e.g. it can be OSH training.
If the option is enabled, the Trained field will be accessible on the Arrival and departure screen, which can be in the form of a check box or a button symbolizing the
signature pad. At the same time, the related settings are expanded:
| Title | Example |
|---|---|
| For everyone | |
| Allow untrained persons to enter | |
| Automatically open the signature dialog | |
For everyone
Training will be mandatory for all visits, i.e. it will not be possible to identify persons who do not have to complete the training.
Allow untrained persons to enter
If the option is active, it will be allowed to mark the arrival when a visitor who has
not been trained arrives. The warning window will contain a Continue
button. If this option is inactive, the Continue button will not be present and therefore
it will not be possible to mark the arrival of a visit until it has signed the relevant
trainings.
Automatically open the signature dialog
AIf the "Automatically open the signature dialog" option is active, then after selecting a person from the list of regular visits (or after reading the MRZ document with a reader), it is first checked whether the person has valid training. If so, the information "Training valid" is displayed. Otherwise, the document signing process starts automatically.
The signing dialog will only open automatically if
- a signature pad is attached
- the trainings are required
- DESKO reader is connected
- the option to automatically open the signing dialog is checked.
Prior to the opening of the dialogue, the validity of the training will be checked only if another condition is met in addition to the previous conditions
- "Document number must be entered", because uniquely one can only be found by the document number. According to the name + surname, it is not possible to unambiguously find a person and thus verify whether he has been trained.
MRZ reader connected
If the option is enabled, figure is displayed if the webLuxDoor application cannot
read data from the document reader. In this case, it is necessary to activate the
application window, e.g. by left-clicking anywhere in the Arrival and departure
window.

Automatically submit the form after document read
If the option is enabled (and the document reader is connected to the computer), then
the visit will be registered in the system automatically after reading the document by
the document reader, i.e., the doorman will not have to press the Check In button.
Show time and date
If this option is enabled, the current time and date are displayed in the Arrival and departure window.
Also show today's outgoing visits
If this option is turned on, the "Overview of present visits" also shows those visits that have already left.
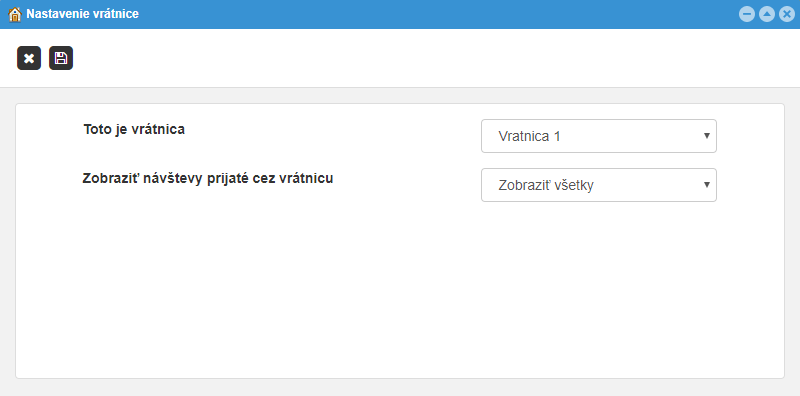
Filter transactions by gatehouse
If this option is enabled, information will be displayed in the Arrival and departure
window:
- the name of this gatehouse, e.g. Gateway 1
- the name of the gatehouse whose transactions are displayed (eg "Show all") in the "Overview of present visits"
- gatehouse settings button
 (only displayed to users with "Gatehouse" rights
greater than "Read")
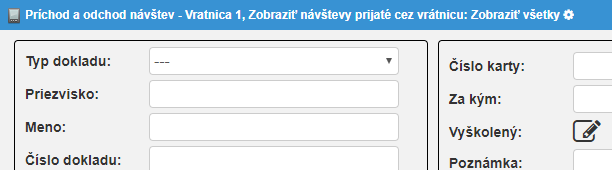
Press the "Gatehouse settings" button to display the settings window.
Strict gatehouse mode
If the option is enabled, the doorman can record the "Departure" only of those persons who entered through that gateway. In other words, visits that entered the building by "gatehouse 1" cannot leave by "gatehouse 2".
Gatehouse setup according to the
If the option “Workplace / computer” is selected then which gateway this is, is set on the computer. If the "Doorman" option is selected, the gateway is set according to which user logs
in to the application. How to set up the allocation of gatehouses to doormans is
described in the section 3.13 Gatehouses. If a doorman who does not have an
assigned gatehouse logs in to the application, you will see "Unset gateway" in the
header of the Arrival and departure screen and the user will see visits
coming through all gatehouses.

# Optional fields tab
If you need to save other data with the visit data than the one offered by the pre- prepared fields, then such fields are defined in these settings. For example, if you need to save the „delivery note number“, check "Optional field 1" and write "Delivery note no." In the field that appears. Save the settings.
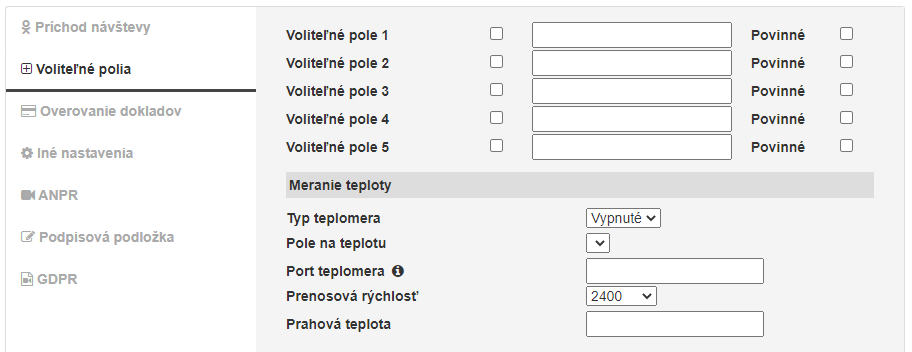
From now on, a new text box is available on the Arrival and departure screen.
It is also possible to mark the optional field as "Required".
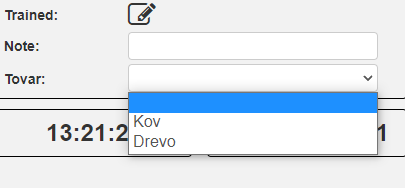
Selection field
In addition to the text field, the optional field can be set as a selection field. Check one of the boxes, for example "Optional field 1", and type "Goods | Metal | Wood" in the box that appears. The optional field will be named "Goods" and the selection items will be "Metal" and "Wood".
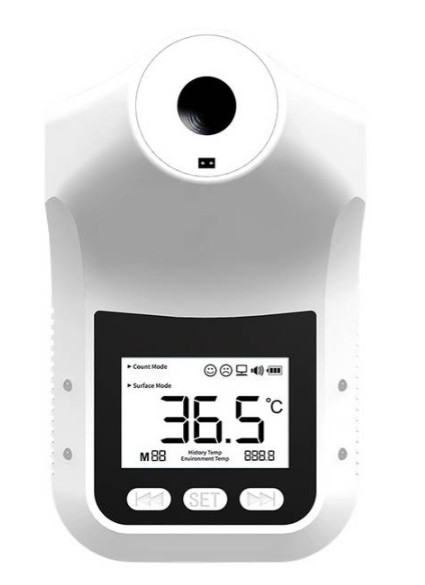
Temperature measuring
Optionally, it is possible to measure the visitor's temperature using a thermometer. If the customer has a temperature higher than the set threshold temperature, a warning window will pop up. The temperature is stored together with other information in a database. It is necessary to fill in the data: Thermometer type, Temperature field, Thermometer port, Baudrate, Threshold temperature.
# Document Verification tab
Verify lost documents online
If the option is active, the Slovak and Czech documents are verified against the database of lost documents.
Verify document validity
If the option is active, a warning window will appear with the information "Document has expired!" If the provided document has expired. For this purpose, it is necessary to store information on the validity period of the document in the database.
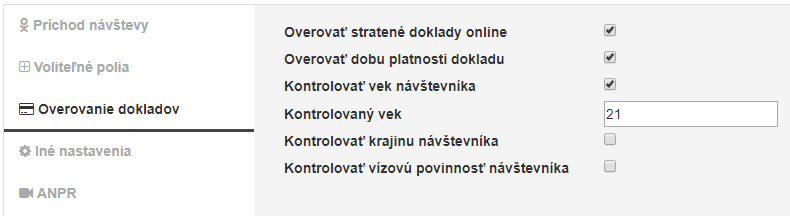
Check visitor age, Check age
If the option is active, a warning window will appear with the information "The
visitor is not 18 years old!" If the visitor does not have the required minimum age.
The minimum checked age is configured in the Check age field.
Note
The field for entering the age is not visible and therefore this function is accessible only when using a document reader, more information in the section 2.2 Connecting a document reader.Verify visitor's country
If the option is active, a warning window will appear with the information "Unknown abbreviation of the state 'EST'!" if the State is not in the list of countries defined on the Countries screen (for information on the screen, see 3.7 Countries ).
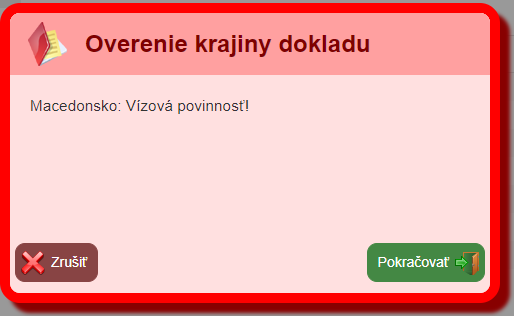
Check the visitor visa requirement
If the option is active, a warning window will appear with the information "Estonia: Visa requirement!" If the State has a visa requirement (for more information, see 3.7 Countries ).
# Other settings tab
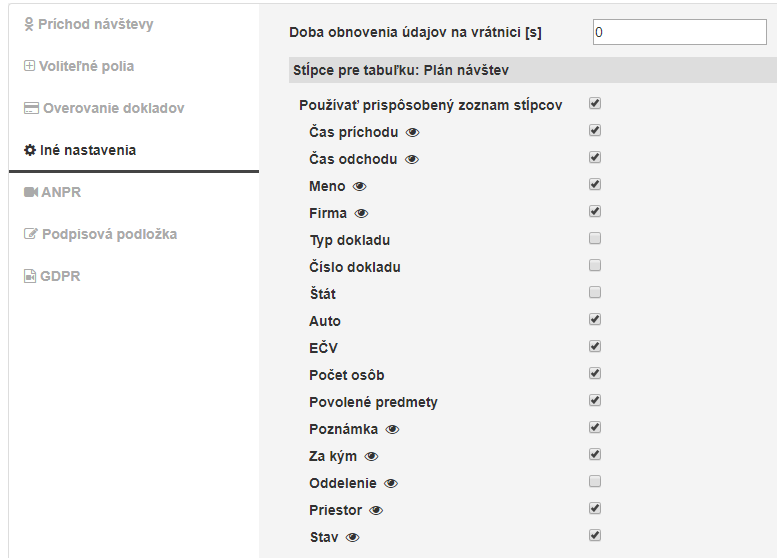
Refresh timeout on the gatehouse [s]
The setting determines how often the list of visits present on the Arrival and departure screen will be refreshed. A value of "0" means that the list will
not be refreshed automatically. You can refresh the visit list manually at any time by
selecting the "Refresh view" option from the context menu. If there is
only one computer on the gatehouse to record visits, you can set the value to "0".
Columns for table: Schedule of visits
Select the columns that will appear on the Visit Schedule screen.
# Signature pad tab
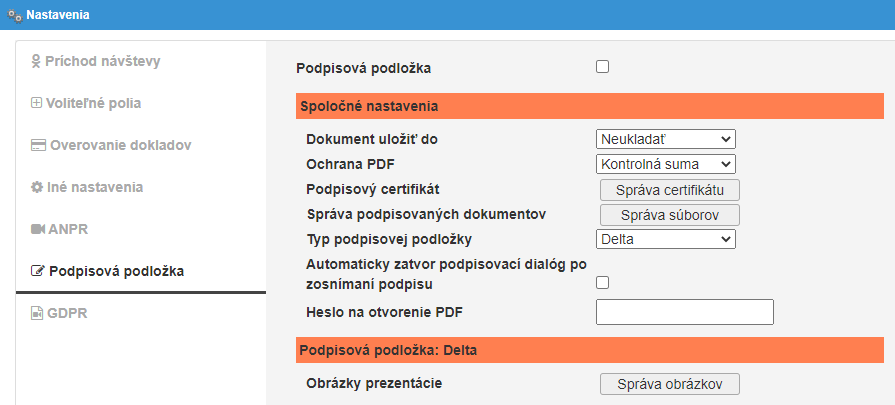
Signature pad
If the option is active, the signature pad module is activated.
Common settings
Save the document to
[Do not save / Database / Disk] - Sets the location of the signed document.
PDF protection
[Hash / Signing certificate]
Hash : A checksum will be calculated from the signed document when the document
is created. It will be stored in the database and will be verified each time the PDF
document is viewed (by clicking on the icon  ). If the checksums match, a message
will be displayed.
). If the checksums match, a message
will be displayed.

If a document other than the one signed by the visitor is displayed, it will be displayed

Signature certificate: When creating a document, it will be signed with an electronic certificate. A message will appear when viewing such a document (by clicking on the icon )

If the document was not altered, it is necessary to verify it in the PDF document viewer

Signing certificate
Used to upload / delete the certificate by which the PDF document will be digitally
signed (if the PDF protection option is set to Signing certificate).
Management of signing documents
When using the Delta signature pad, it is possible to require that up to 5 different trainings be signed (Up to 5 signatures can be required from the visitor).
The Sigma signature pad allows to take only 1 signature from the visitor and therefore it is possible to set only 1 training and 1 document for signing (however, the content of the signed document may consist of several documents, if permitted by law). If you want to sign more documents, please contact APIS spol. s r.o.
Delta signature pad
The first step is to set how many different trainings will be signed. The training list is
set by clicking on the "Training list" icon
 .
.

Next, you need to add documents. Click on the "Add a new document" icon
 .
After adding a document, you need to set it up.
.
After adding a document, you need to set it up.
Location of texts in the signed document
Items can be inserted into the PDF document: Name and surname, Document number, By whom, Visited areas, Card number, Vehicle registration, Time of arrival,
Signature, Confirmation questions.
Check the box next to the option to select whether it will be embedded in the PDF
document. The Location button displays a window where you can set the position in
the PDF document on which the item will be placed. Items will be placed on the last
page of the PDF document.
When placing items, be sure to leave the box far enough away from other items as
well as from the edge of the document. If an item extends beyond the edge of the
page, it may be automatically repositioned.
For each document, you need to set "Description", "Page width [mm]", "Page height
[mm]", "Signature height [mm]", "The font size of the text on the signature pad [pt]" and "Margin". If the "Pagination" option is activated, then when the given document is displayed on the signature pad, arrows are displayed, with the help of which it is possible to jump to the display of the next or previous page. Smooth document scrolling is possible regardless of the "Pagination" setting.
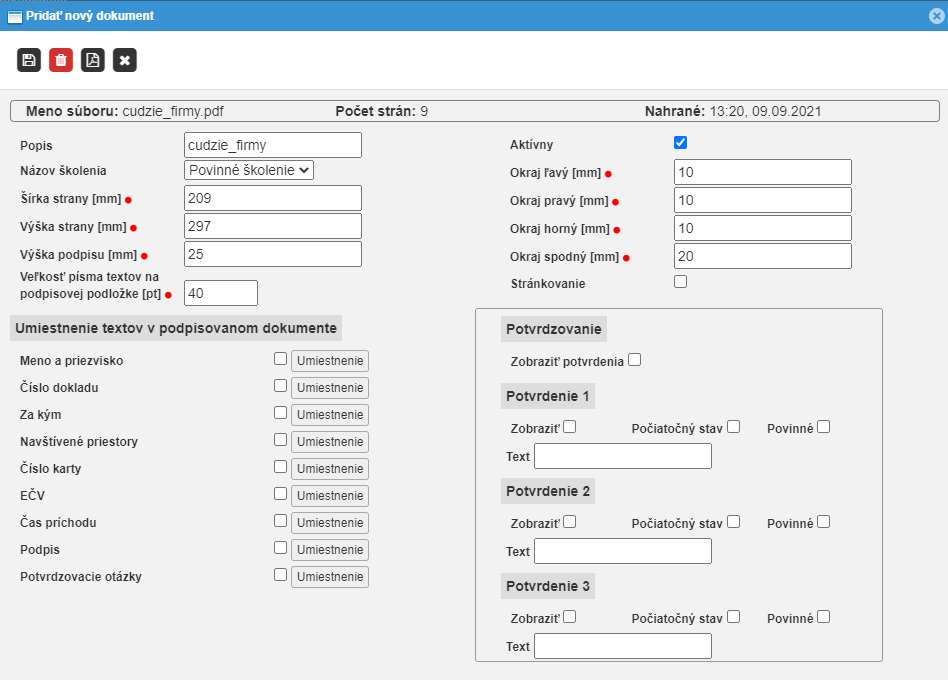
It is also possible to set confirmation phrases to which the visitor responds before signing the document. An example of confirmation is shown in figure.
The order of the documents can be changed by moving the lines. The visitor then selects which document to display and then sign. Currently, a maximum of 13 documents can be uploaded. Each document can have a maximum of 20 pages.
Sigma signature pad
The procedure for managing the signature document is the same as for the Delta signature pad, with the difference that the system allows you to add only 1 training and upload 1 signature document.
Signature pad type
[Sigma / Delta] - select the type of attached signature pad.
Automatically close signature dialog after signature is captured
If the option is active, the signing dialog will close automatically after the visitor signs. The doorman thus does not have to take the action of closing the dialog box, i.e. saves one click.
Password to open PDF
If a value (password) is entered, a password will be required when opening the PDF.
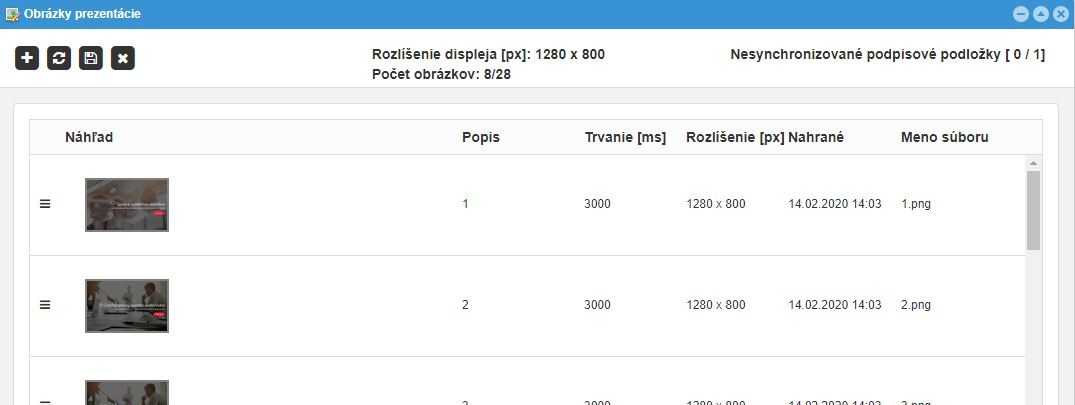
Presentation pictures
The screen is used to manage the images displayed on the Delta signature pad while the document is not being read / signed. Images are played back cyclically. Each image is displayed for the time set for that image. The default display value for each image is 3 seconds.
# GDPR tab
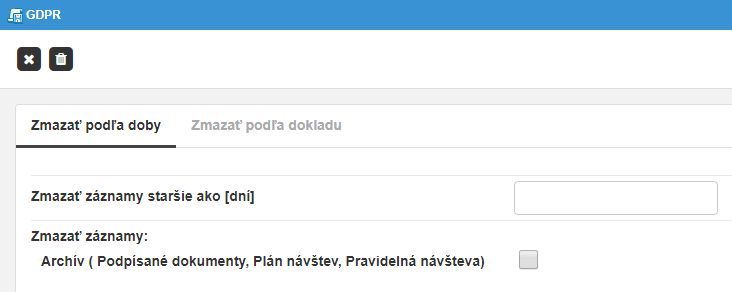
The tab is used to set automatic deletion of old visitor records.
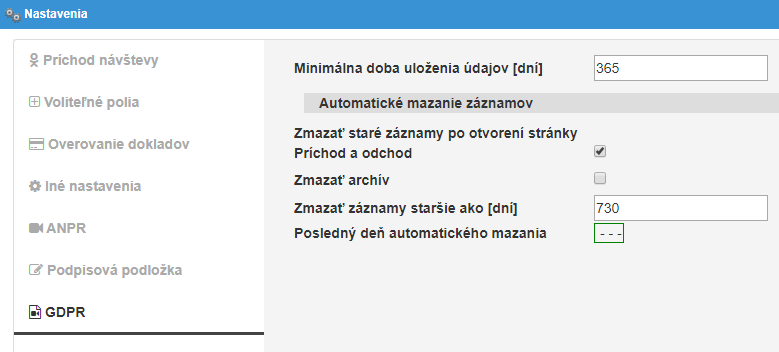
Minimum data storage period [days]
In the GDPR window (see 3.14 GDPR) it is possible to manually delete the visitor
record. However, this record must be older than the "Minimum data storage period"
value set.
Delete old records when you open the Arrival and departure page
The automatic deletion of old visitor records can be started in three ways:
-
deletion, executes the script, which is set to run automatically at the set time
-
checking (and deleting) old records is always performed when the Arrival and departure window is opened
-
by manually starting the scan of old records in the window 3.14 GDPR.
Delete archive
If the option is active, all visit records, including signed documents, will be deleted.
Delete records older than [days]
The number of days that visit records will be kept.
Last day of automatic deletion
Information field showing the date of the last check (and deletion) of old records.
# Graphs
The screen displays data on currently present visits and statistics for the current day.
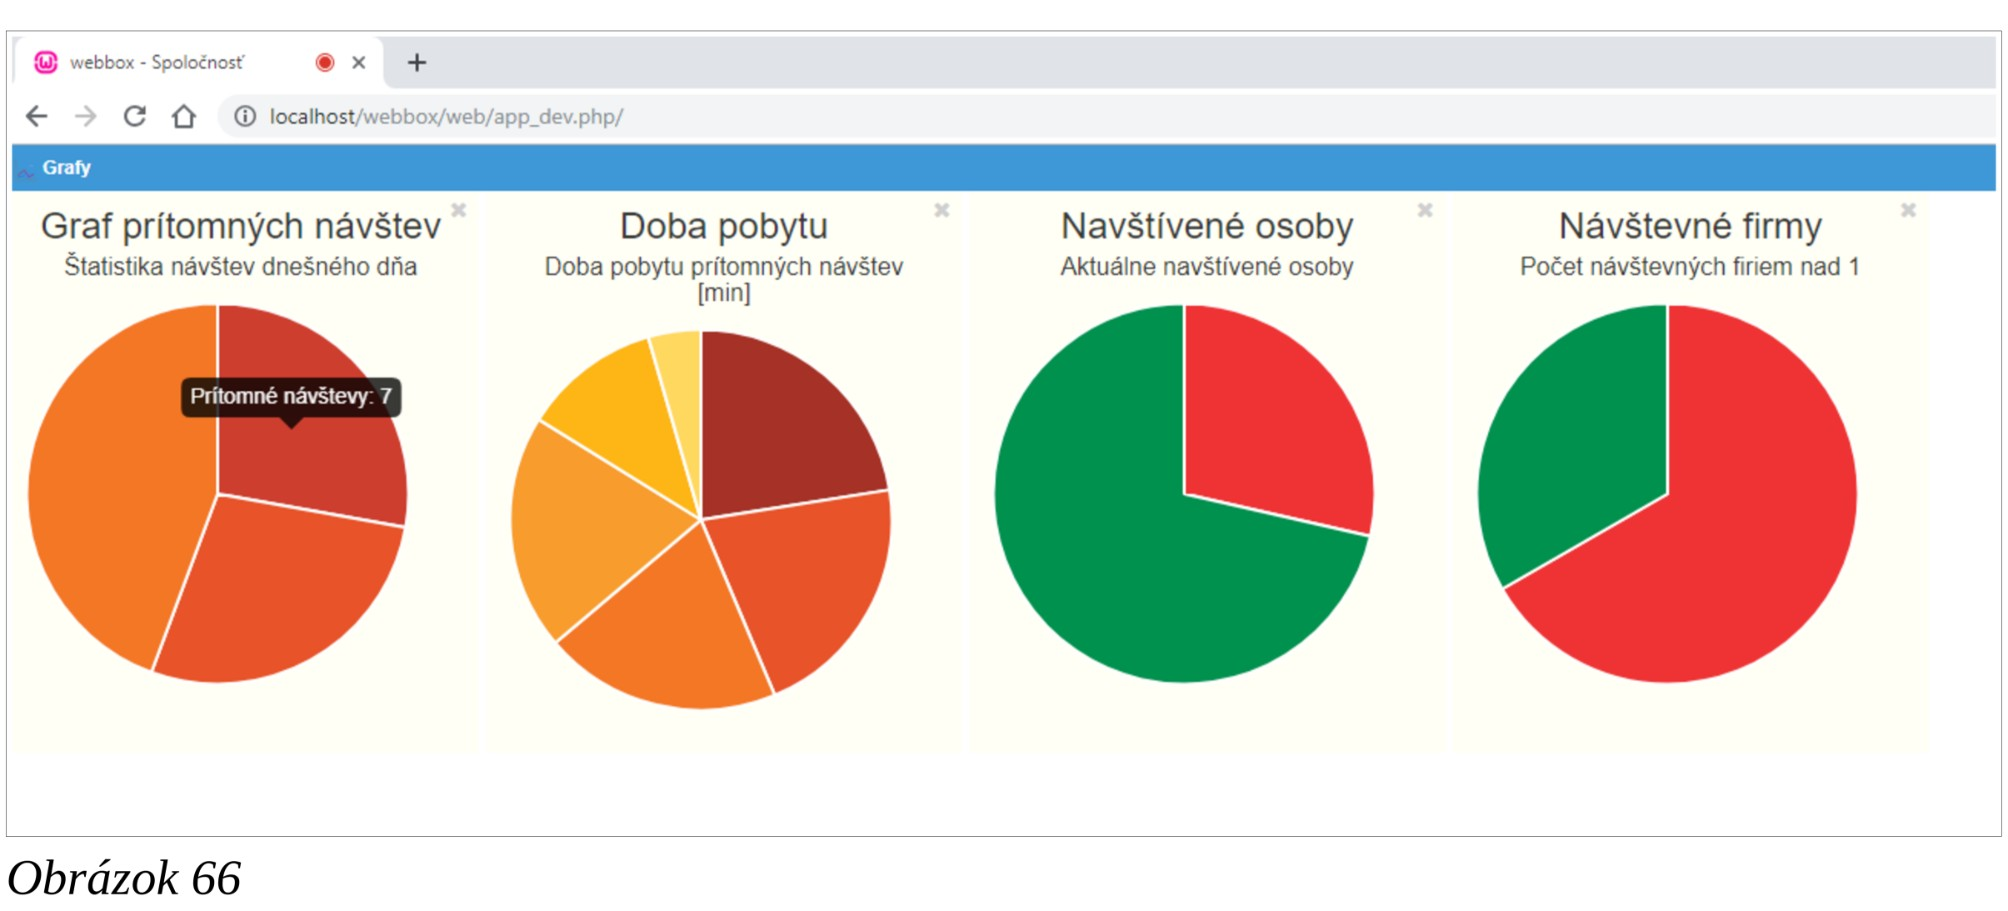
The following information is displayed:
- Graph of present visits
- Duration of stay
- Visited persons
- Visiting LPN
- Visiting companies
# Statistics
The screen offers a graphical display and the option to select the displayed period of different visit data. An example of the display is shown in figure.
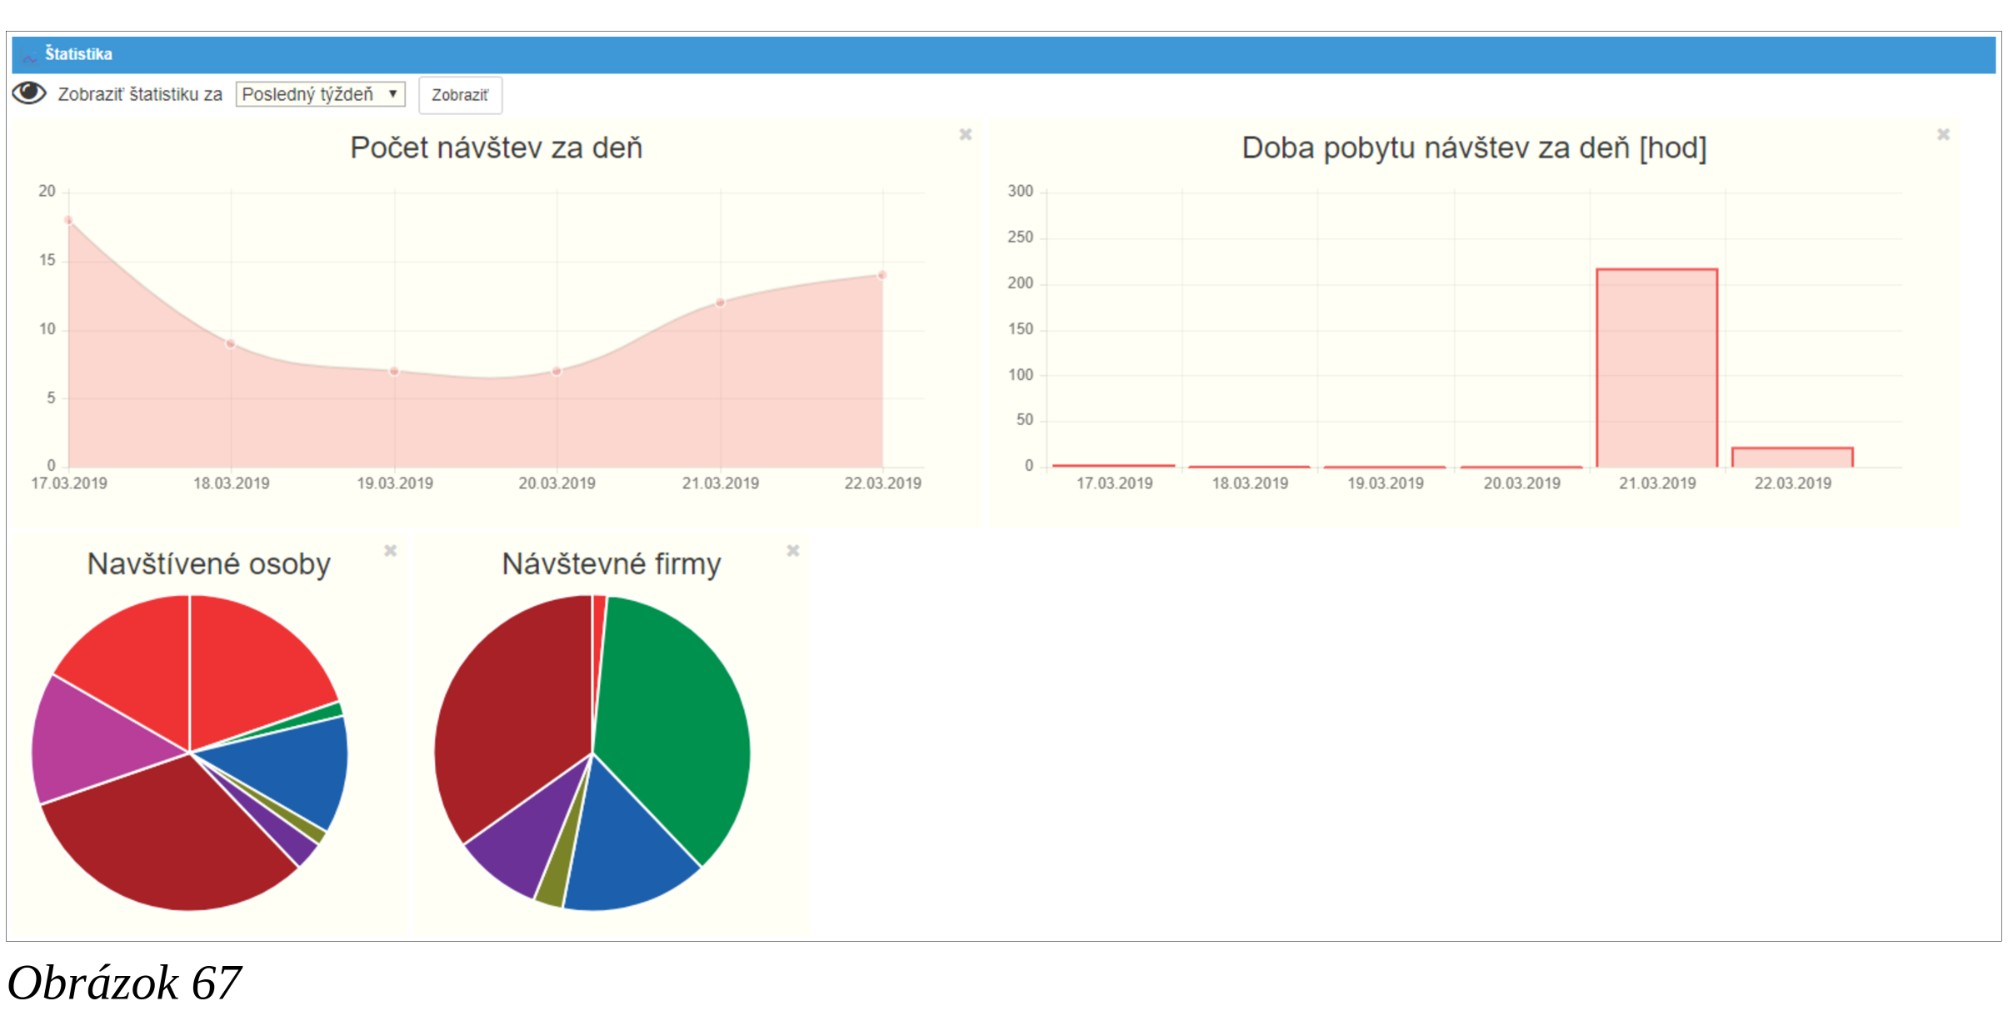
The following statistics are displayed:
- Number of visits per day
- Length of visits per day [hours]
- Visited persons
- Visiting LPN
- Visiting companies (the graph shows the number of visits according to the name of the company from which the visit is made)
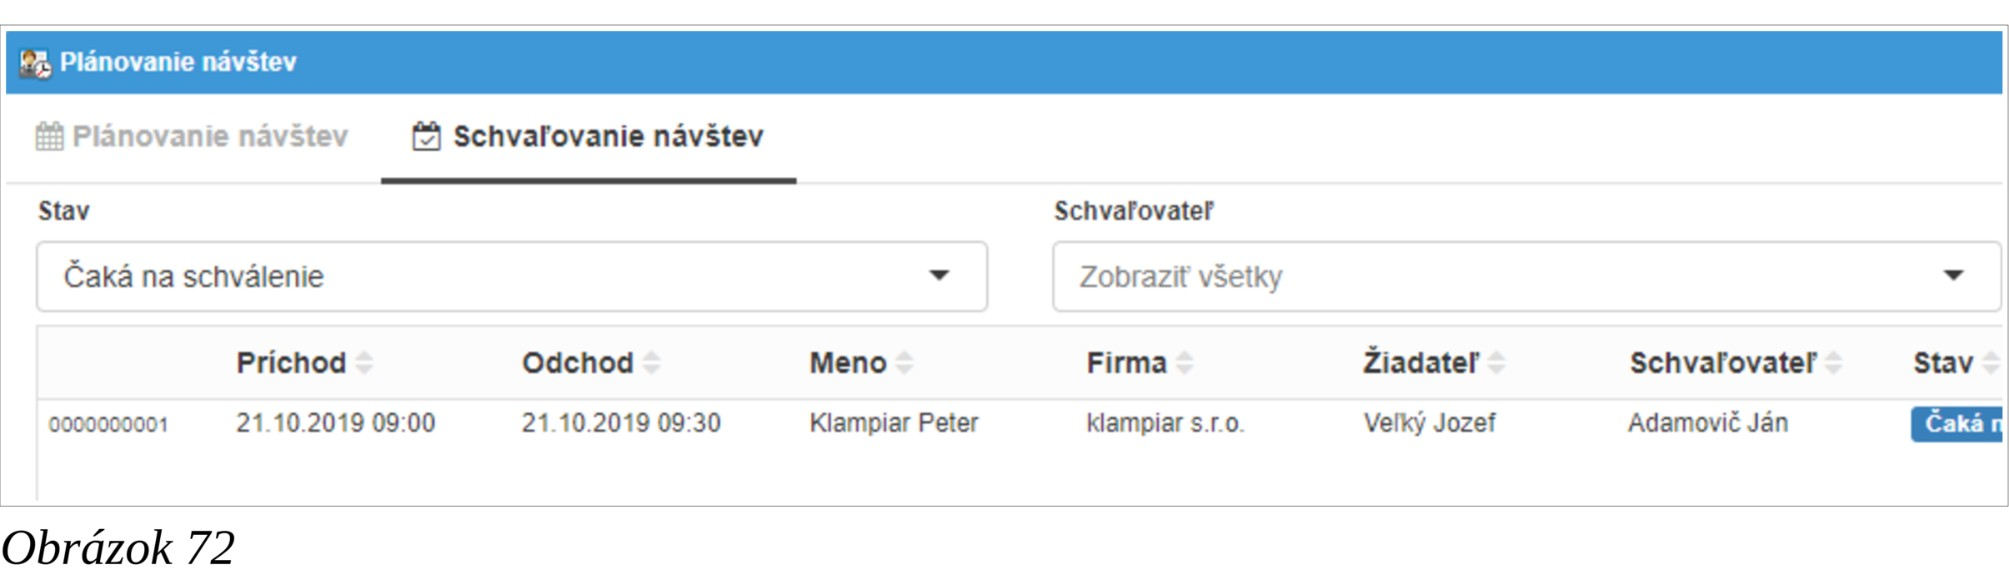
# Planning of visits
The screen is used to manage (overview, create, edit, delete) scheduled visits (see "Schedule visits" in 3.9.1 Check in of visitor tab). If the approval of visits is active (see “Approval of visits” in 3.9.1 Check in of visitor tab), the tab for approving / rejecting visits is available. If an e-mail SMTP server is available, it is possible to set up the sending of an e-mail notification to the approver after a new visit is scheduled. If the visit is planned by a user who has the right to approve the visits, then approval is not required. See "Send notification email" and "Notification email from" in 3.9.1 Check in of visitor tab.

Another option is to send a request to a person who is interested in visiting the company. In this case, the person will receive an e-mail with a link to fill in the data
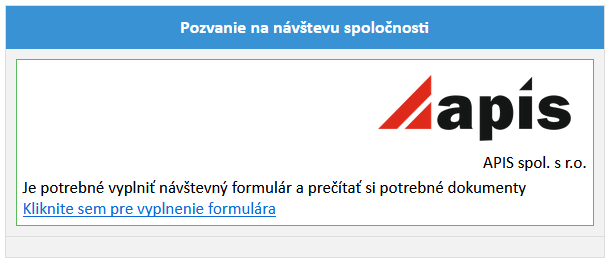
After clicking on the link, the visitor can fill in the form.
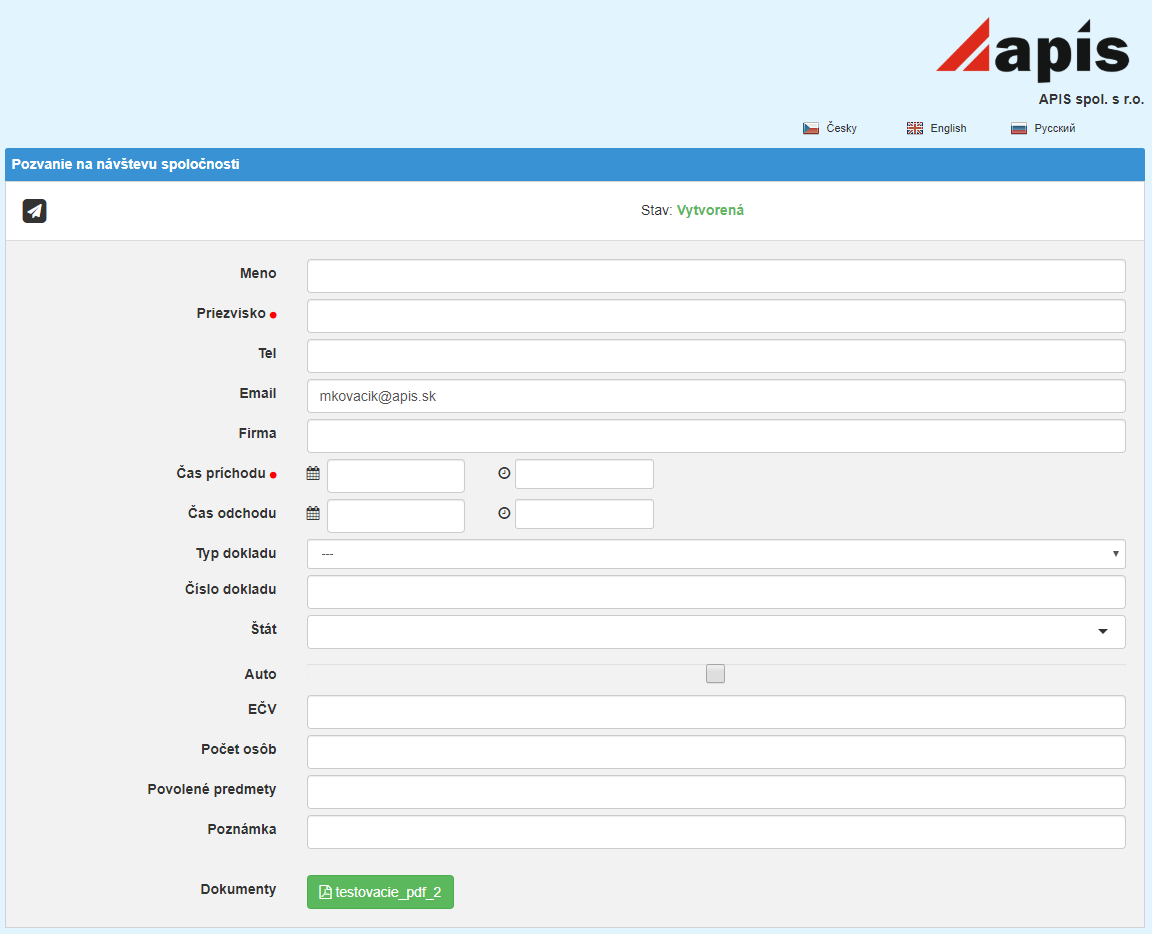
After submitting the form, the application is registered in the system, and the approver receives an e-mail with links to approve / reject the visit.
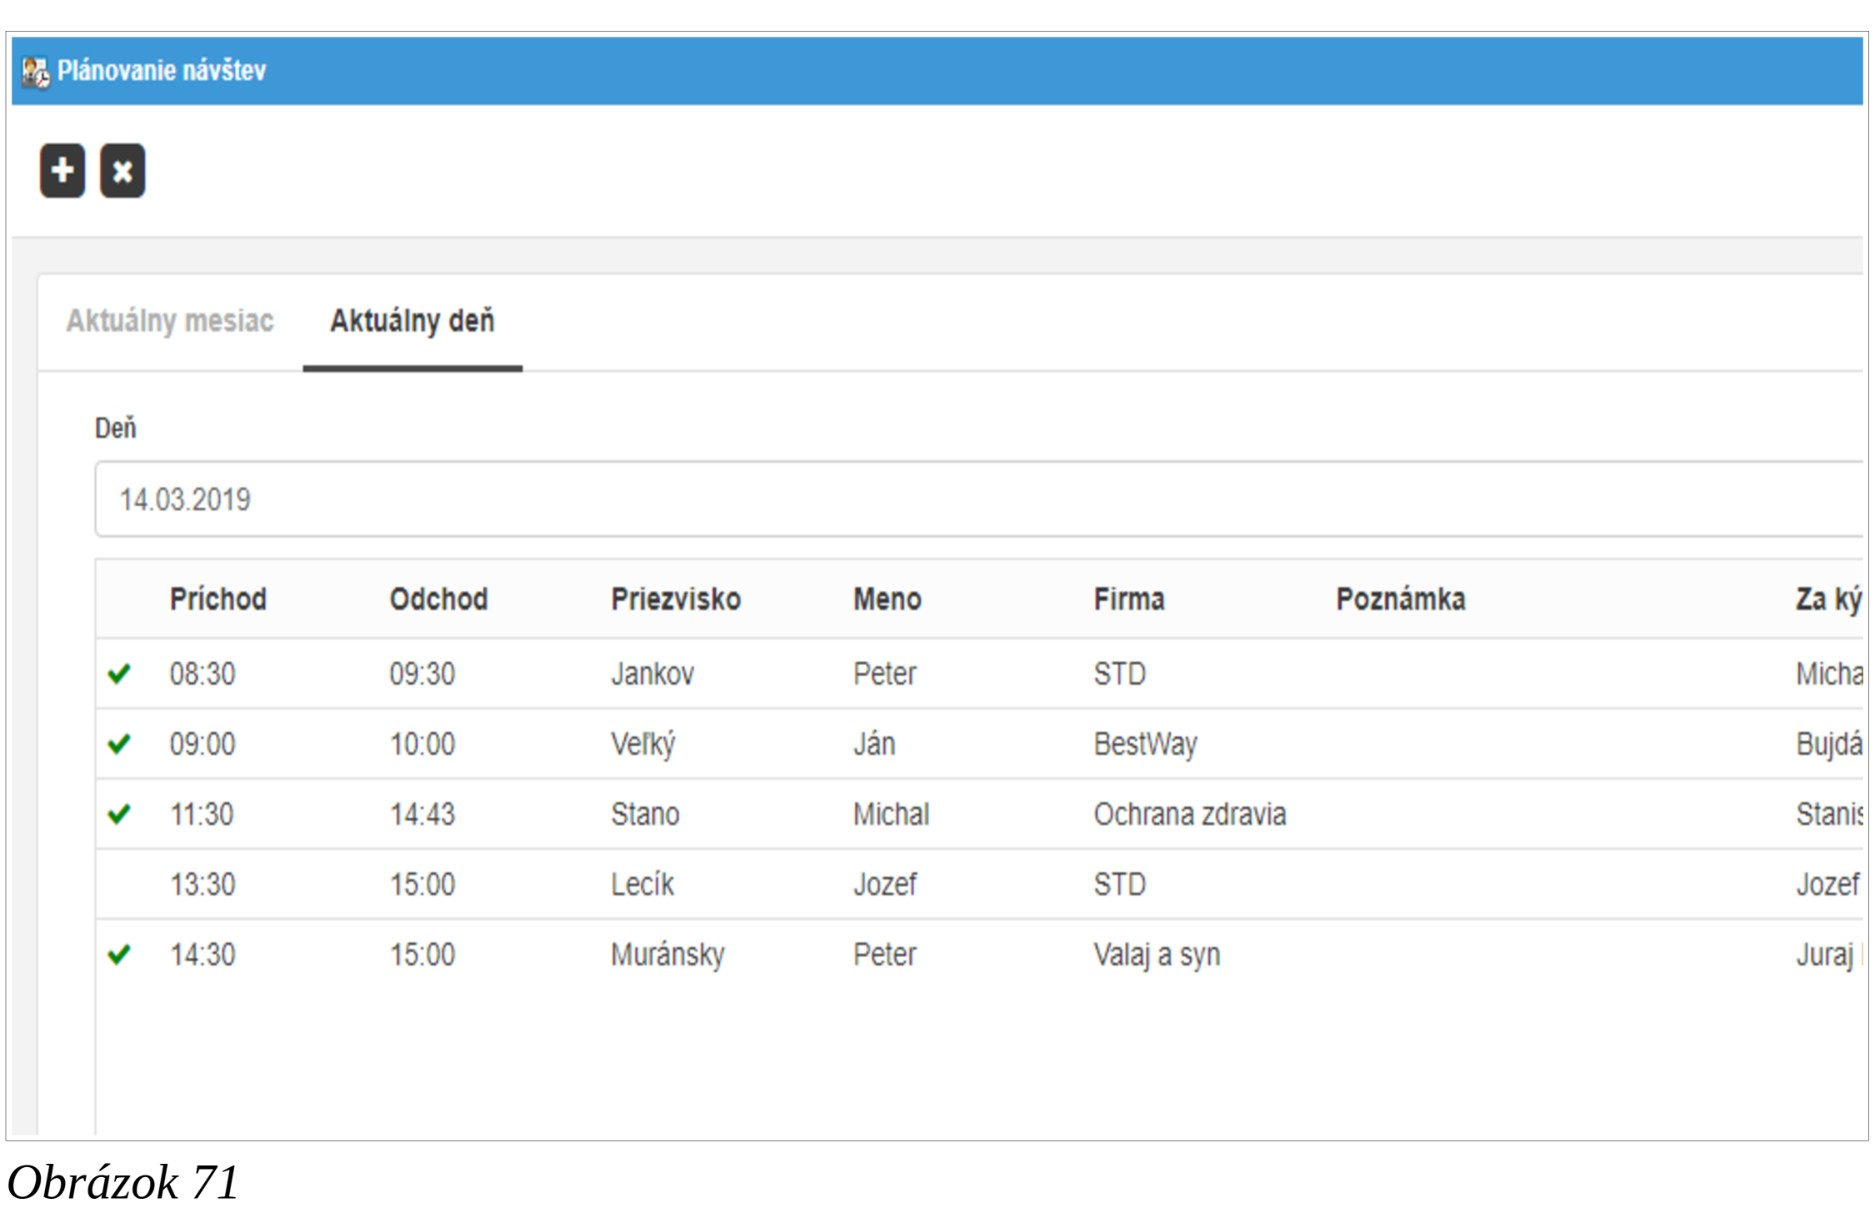
On the Arrival and departure screen, you can call up the list of scheduled visits by
clicking the Schedule of visits button. Which columns are displayed in
the table are set (see section 3.9.4 Other settings tab). It is then possible to select (by
double-clicking) the person from the table. Once the arrival has been recorded, the
arrival of the visit will be paired with the entry in the visit plan. In the report of
scheduled visits, you will see which of the visits have already arrived and which have
not yet.
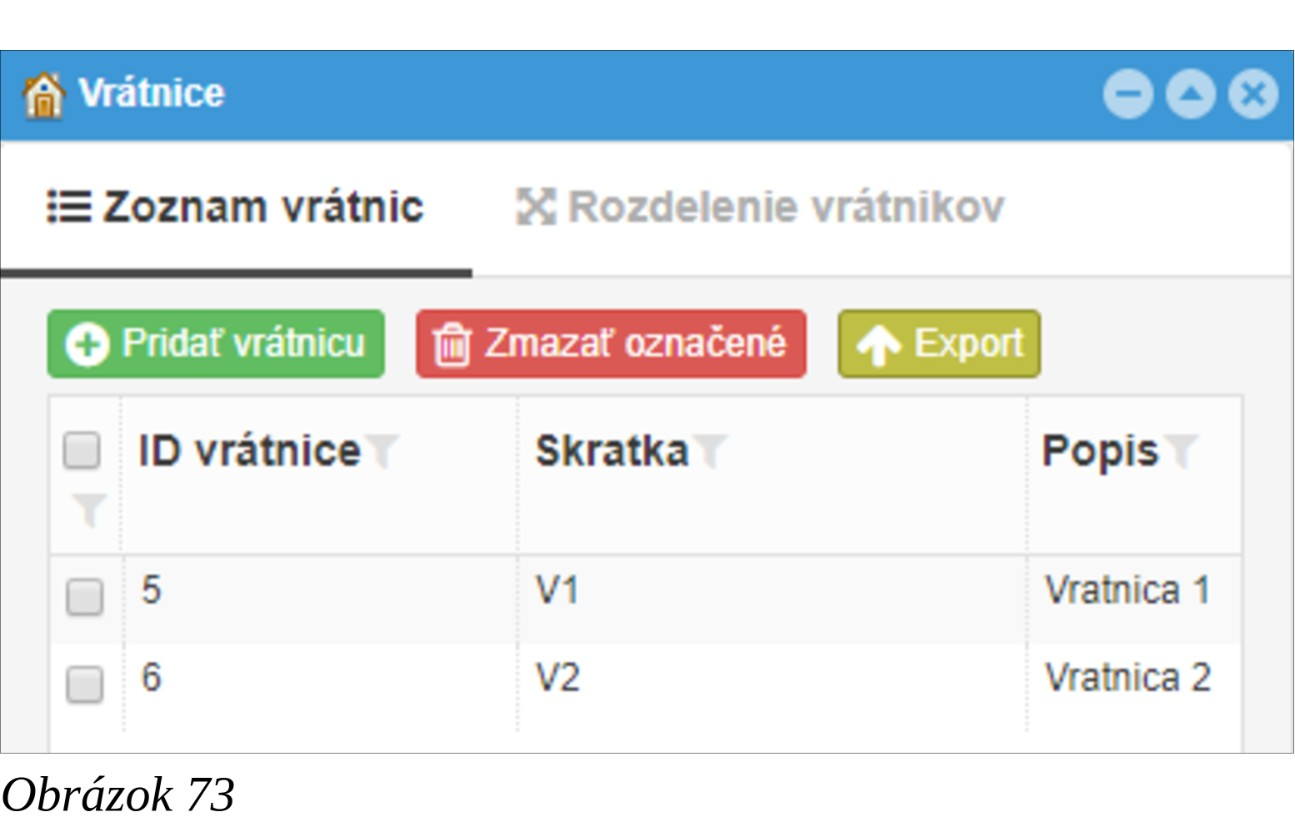
# Gatehouses
The screen is used to manage the gatehouses. If there are more gatehouses in the company, it is necessary to activate the option "Filter transactions by gatehouse" or "Strict gatehouse mode" (see the section 3.9.1 Check in of visitor tab).
'List of Gatehouse's" tab
Used to manage (create, edit, review, delete) the gatehouse list.
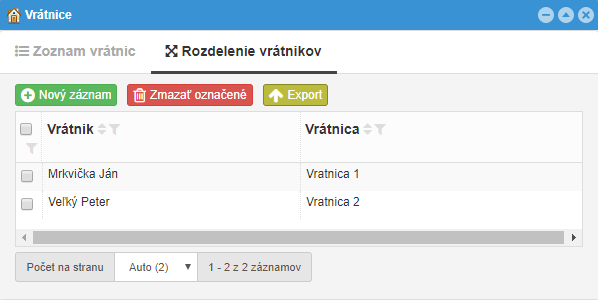
"Division of porters" tab
The settings will only be applied if the Gateway setup according to the is
set to "Doorman" in the settings. In this case, after the user logs in on the Arrival and departure screen, the gatehouse is set according to which gatehouse the user is
assigned to in this table.
# GDPR
In the window it is possible to manually start the check and automatic deletion of all visitor records older than the specified number of days (by respecting the value "Minimum data storage period" - see 3.9.6 GDPR tab). It is also possible to manually delete visitor records according to the document number, e.g. according to the number of the ID card.