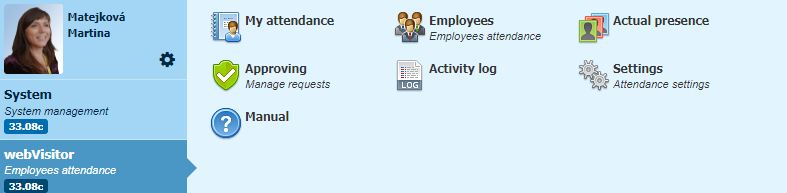
- webVisitor
- webVisitor - Section intended for the user
# webVisitor - Section intended for the user
# User section
# How to proceed when creating transactions
Always check the "selected transaction" box before making a transaction if the transaction is selected correct, you can place your finger or card on the reader. If necessary, select a different transaction type. And put your finger or card on the reader.
# Arrival to work
When you arrive at work, select Clock in and place your finger or card on the reader.
# Leaving for a break
When leaving for a break, select the Clock out (unless it is already selected) and the reason for leaving (e.g. departure + lunch) and place your finger or card on the reader.
# Arrival from break
When returning from a break, select Clock in (unless it is already selected) and place your finger or card on the reader. Note: When returning from a break, selecting the reason of break in not needed, only the arrival needs to be selected.
# Leaving work
When leaving work, select Clock out and place your finger or card on the reader.
# Special arrival
When leaving work, select Clock out and place your finger or card on the reader. - Example: If you visited a doctor before your arrival, then select Clock in + doctor and place your finger or card on the reader. The attendance itself completes the beginning of the working hours (defined in the attendance settings) until the moment of your arrival break - doctor.
# Special deparature
Example: If you know that you are going on vacation or similar (e.g. sick leave) from the next working day, select Clock out + vacation and place your finger or card on the reader. Attendance itself will supplement your vacation for the next working days until your arrival.
# Valid transaction
If the terminal accepted the transaction, the user's name and the type of transaction will appear on the terminal.
# Invalid transaction
In this case, it is necessary to repeat the transaction - Try to put your finger on the reader better, or use another finger stored in the system. In the case of a card, use a valid card.
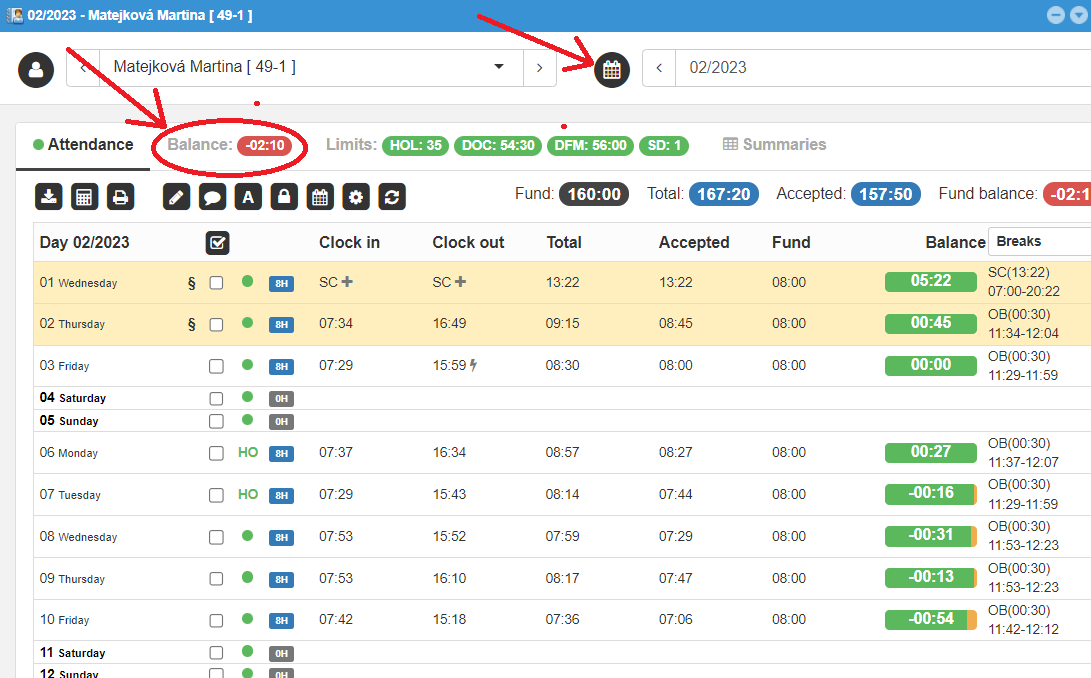
# Attendance
# Employee attendance screen
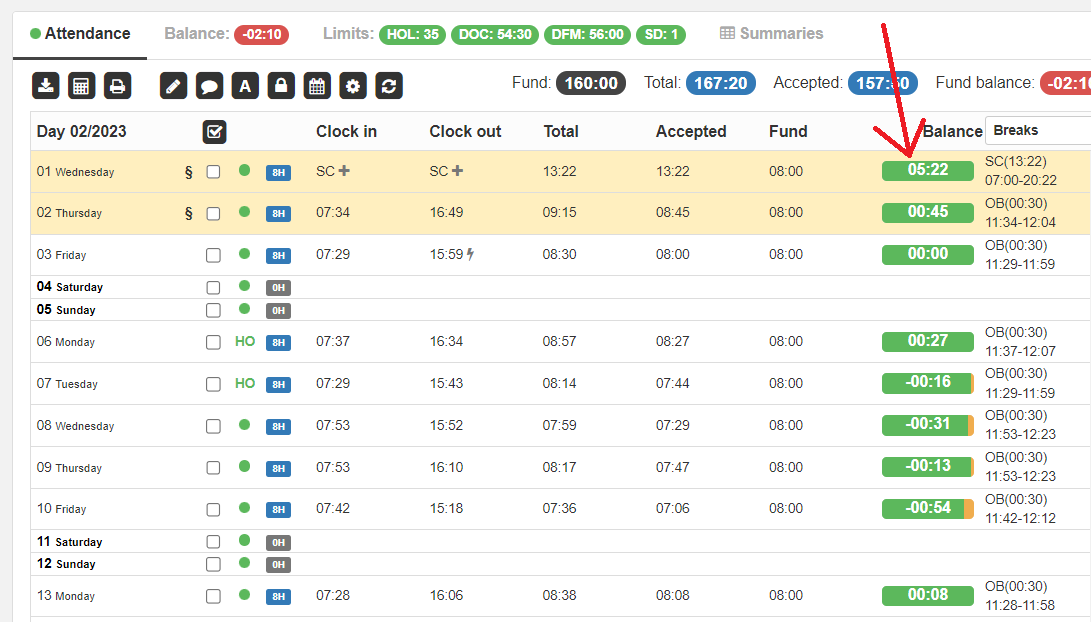
Open the attendance overview of the logged-in employee. Here you can see an overview of attendance for the whole month and the current balance.

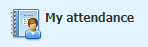
- The list of employees will be expanded and the attendance of the selected employee will be displayed (if the user has the right to see only his attendance, he can only see himself).
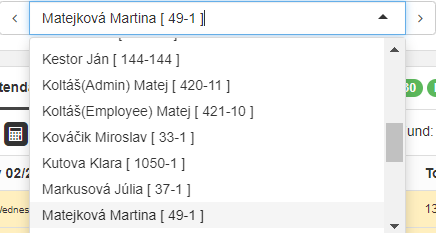
- By clicking on the date box, the calendar will expand and we can select the period that we want to display.
- It shows the attendance of the selected employee for the selected period with a summary of the hours worked and the current fund balance for the current month.
When the balance is positive: current balance is green.

When the balance is negative: current balance is red.

- Displays attendance summaries of the selected employee for the selected period.
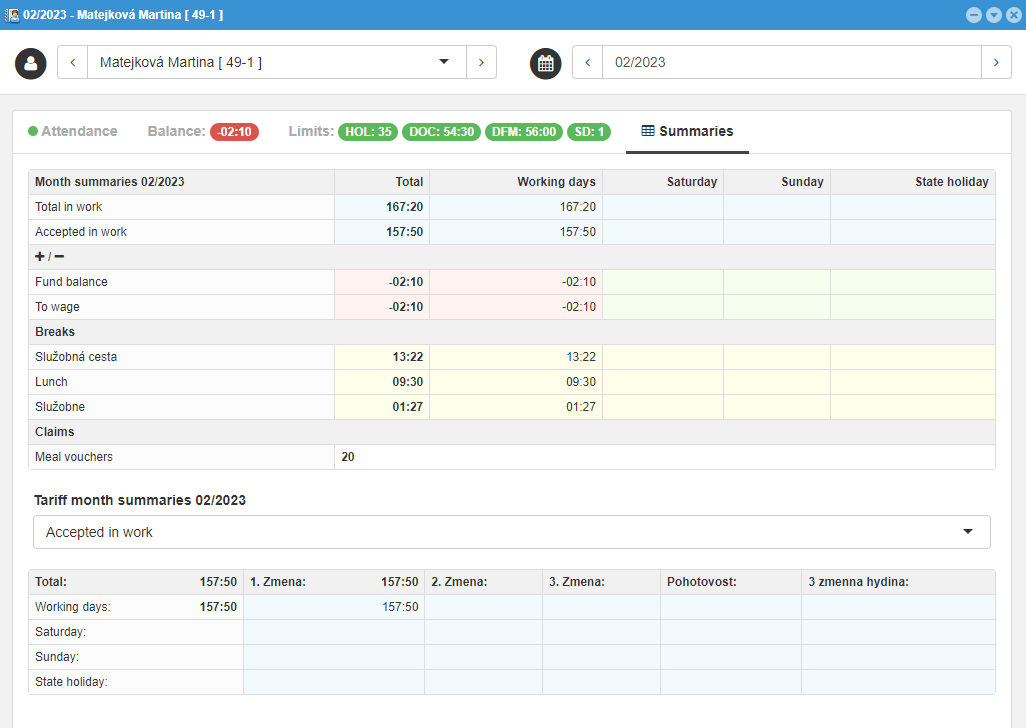
- Functional and editing icons - their display and quantity depends on the set permissions.
- Ability to toggle the display of breaks and notes.
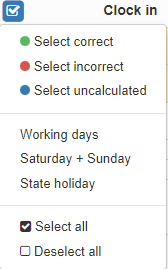
- Option to mark and unmark records.
- Adjustment of monthly balance for transfer to wages.
- Displaying the current balance for the current monthly fund.
- Display of break limit balances (holiday, doctor, family member doctor) - display depends on the setting of break limits in Group settings - Break limits.
# Functional and editing icons in the My Attendance view
Functional and editing icons are used for working with attendance (editing and evaluating attendance). The number and display of functional icons depends on the set permissions of the logged-in user.
Functional icons:
 - Download transactions
 - Recalculate attendance
 - Print attendance - it is possible to print the employee's monthly statement and other printouts (according to the offer in the scrolling menu) in print form, in pdf, or export to excel
 - Approve attendance (one check mark - employee, two check marks - supervisor.) The icon appears only if approval of attendance is defined in the settings. The employee can approve attendance himself. The supervisor is notified by e-mail that he has to approve the employee's attendance. After the supervisor approves the attendance, the employee is not authorized to change the attendance. Only head of the company or higher authority can unlock it and then it can be repaired.
 - Add a Daily or Monthly note in bulk. It is the possibility to add the same note for several days. It is necessary to mark the days first and then select the option to add a daily note.
 - Refresh attendance window.
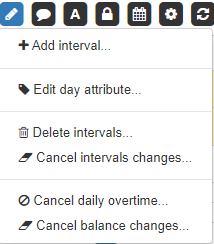
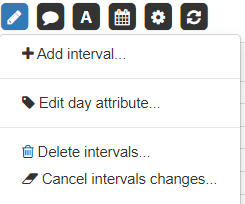
 - Making manual changes and adding missing transactions.
Arrivals, departures and breaks are saved with a
- Making manual changes and adding missing transactions.
Arrivals, departures and breaks are saved with a  sign.
sign.
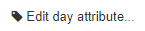 - Adding a day attribute, e.g. Home Office from- to. The attribute will also appear in the note for the given day.
 - Mass deletion of intervals. Transactions can be marked as not downloaded and recalculated it again.
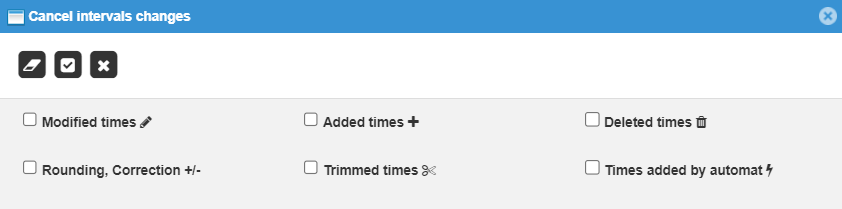
 - Mass deletion of intervals from-to. Option to choose - adjusted times,
added times, deleted times, rounding and correction, trimmed times,
times supplemented by automat......
- Mass deletion of intervals from-to. Option to choose - adjusted times,
added times, deleted times, rounding and correction, trimmed times,
times supplemented by automat......
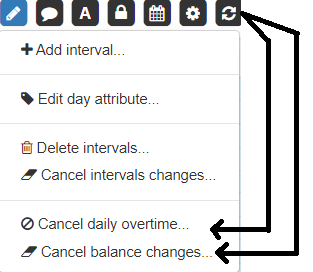
 - Cancellation of daily overtime. All positive balances will not be recognized on the selected days.
 - Cancellation of balance change. Deletes all manually made changes to the balance for the selected days.
Adding notes
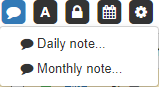
 - Adding a daily note in bulk
 - Adding a monthly note in bulk
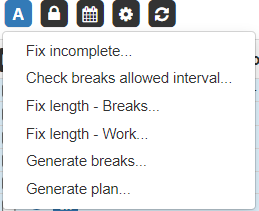
 - Completion of incomplete transactions as set automat. Modifications are always saved with a sign.
 - Checks the allowed breaks interval based on the setting.
 - Fixes the break length according to the set rules.
 - Corrects the length of work according to the set rules.
 - Generates breaks.
 - Generates the plan.
Schedule
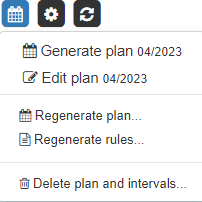
 - Generates a regular fund of working hours according to set rules. Allows you to delete an existing fund.
 - If scheduling settings change (in Group attendance settings in work modes) according to the type of day or cyclic, the function changes the already generated schedule of employees (see !!!!).
 - If the rules change during the work interval (fund, recognize from-to, holiday dates) the function will change the already generated employee schedule.
 - The function deletes the schedule and intervals (all or selected).
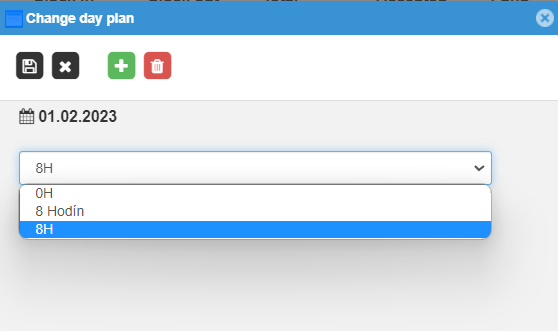
The employee's schedule can be modified directly in the "Employee Attendance" screen by double-clicking on the work interval on a chosen day: 

The "Change daily schedule" menu will appear, where we can add a work interval, delete a work interval or change an existing work interval to another. (The function can be used, for example, when changing the morning shift to a night shift, etc.)
Function icon  Settings overview - display of settings belonging to the employee:
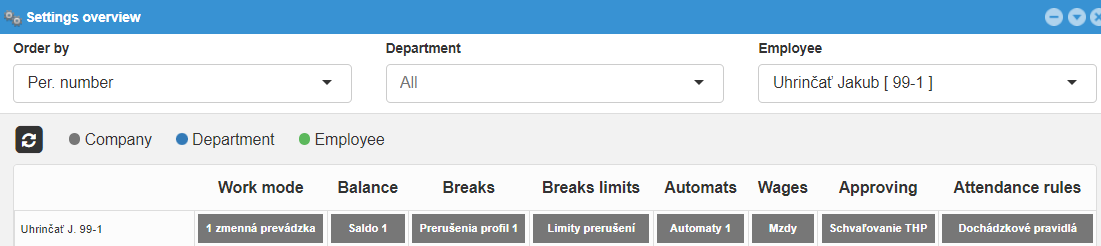
Click on the given setting will show you all options.The options can then be changed. In case of changing the settings, it is necessary to regenerate the rules.
 - Attendance refresh for the set period.
# Viewing the attendance day - Details of the day
In the display, double-click on any or a specific day, a window will open with attendance intervals on that day.
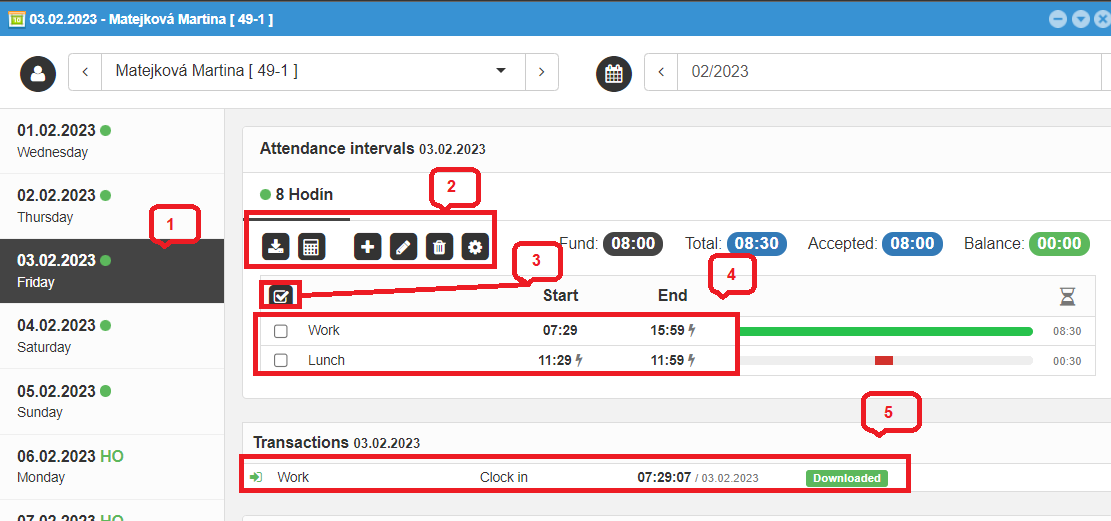
- We choose a day and the detail of the day and the attendance intervals of the day are displayed. Allows you to switch between the days of the entire month.
- Functional and editing icons.
- Option to mark or unmark intervals.
- Intervals of worked time, intervals of breaks.
Note
In case, we scanned incorrect transactions(e.g. instead of leaving for lunch - coming from lunch), we can correct the intervals in a simple way - we move the cursor to a specific time data that we need to transfer and move it to the required place in the interval using the right button of the PC mouse (see image) and delete the unnecessary interval.
- Original transactions downloaded from reader before correction.

The WR mark next to the transaction name means that the transaction was made through the webReader virtual reader. The WRM mark means that the transaction was made through webReader Mobile application. The status of the transaction "Downloaded" means that the transaction has already been matched to the interval. If the transaction needs to be downloaded again (e.g. correction), it is possible to change the status of the transaction to "Not downloaded" by clicking in the green field. Then the field turns yellow.
In the case of editing the original time in the details of the day, it is possible to find out who last edited the interval.
Transactions that have already been included in the calculation are marked as withdrawn and are no longer included in the attendance calculation.
By clicking on the green box  it is possible to mark the transaction as not downloaded, adjust the intervals and recalculate once more:

 - Recalculate attendance – It only recalculates the specific set day.
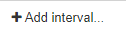
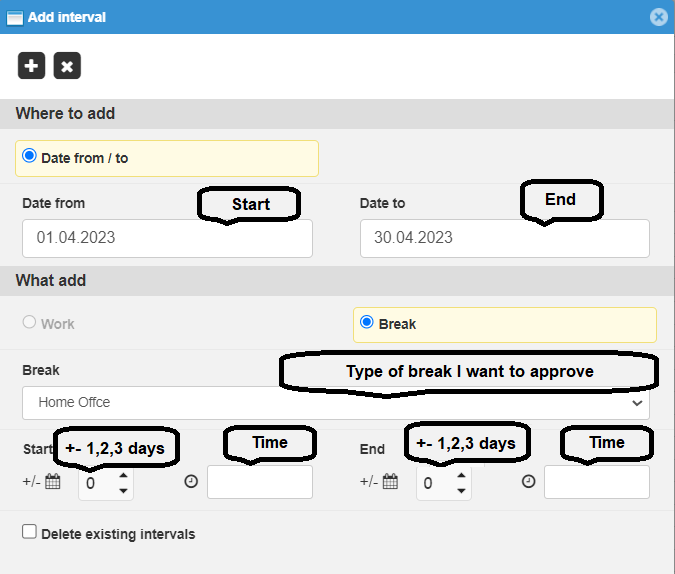
 - Add Interval - is used to add an interval of arrival, departure or start and end of a break.
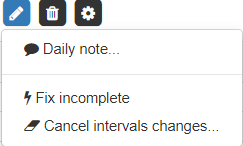
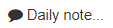 Daily note - Allows you to enter a note for a specific day
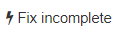 Fix incomplete - Allows you to complete incomplete transactions with a flag .
 Cancel interval changes - Allows you to cancel selected changes in attendance after the night closing time.
Delete intervals. 
# Interval adjustment
You can edit the interval by double-clicking on it . Adjusting the interval Work:

- Allows you to save the modification or cancel the modification.
- Allows you to set the start date of the interval.
- Allows you to set the exact start time of the interval.
- Allows you to set the end date of the interval.
- Allows you to set the exact end time of the interval.
Adjusting the interval Break:
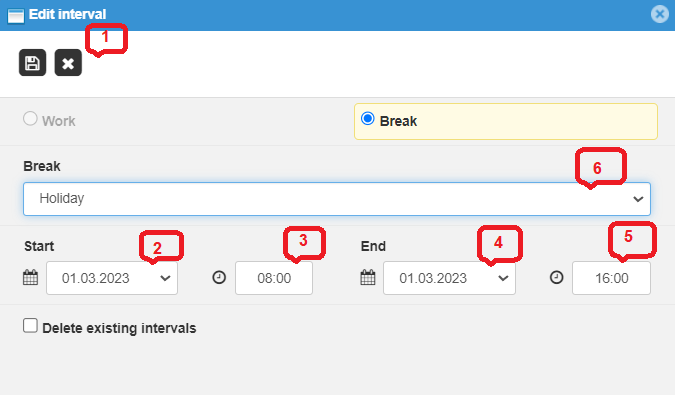
- Allows you to save the modification or cancel the modification.
- Allows you to set the start date of the interval.
- Allows you to set the exact start time of the interval.
- Allows you to set the end date of the interval.
- Allows you to set the exact end time of the interval.
- Allows you to select a break.
# Adjusting the daily balance
Editing of the daily balance can only be carried out by a person authorized to "edit balance" (see 3.2.15). The balance can be edited individually by day or, see above, at intervals from to using the edit icon:
The daily balance is adjusted directly in the Employee Attendance screen, by clicking on the balance area on a specific day:
A table for adjusting the daily balance will appear:
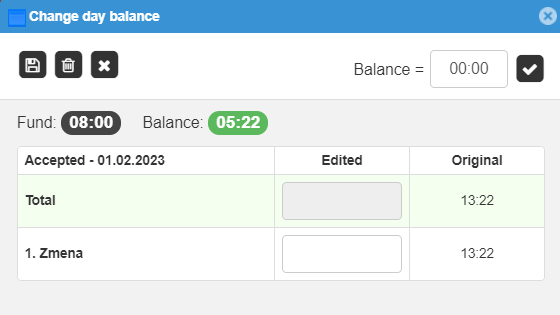
You can adjust the balance in two ways:
-
a. In the upper right, write what part of the balance is recognized - e.g. 00:30 and click
-
b. In the box 1. Shift (2. Shift, 3. Shift) write the recognized time, e.g. 08:30 and save!
If it is necessary to cancel the changes we have made and return to the original times, it is necessary to press the icon "Cancel edited".
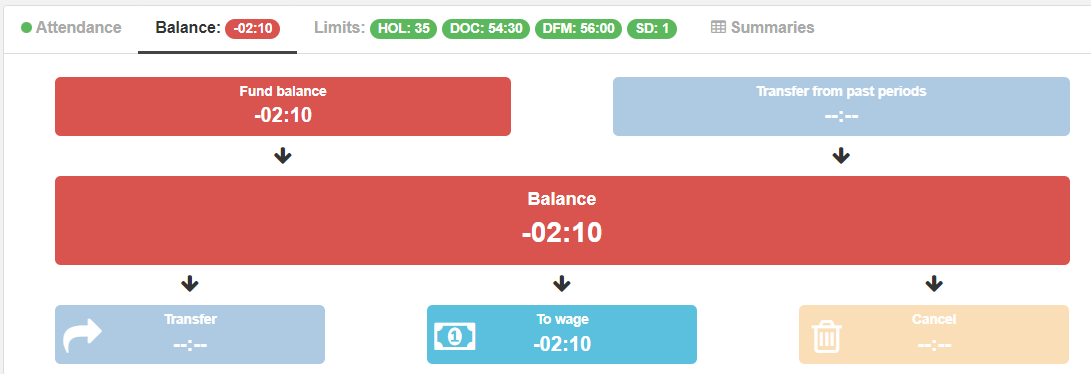
# Adjusting the monthly balance
Editing of the monthly balance can only be carried out by the user who is authorized to edit the monthly balance (delete, transfer to the next period, etc.). We usually adjust the monthly balance after the end of the month, e.g. for 03/2018, we edit on the first days of 04/2018. The closing must not be made for the month for which the balance is adjusted (e.g. for 03/2018). We adjust the monthly balance in the employee's card for the selected period (before the closing date):
Click on Balance in the top left. You will be taken to the balance adjustment table:
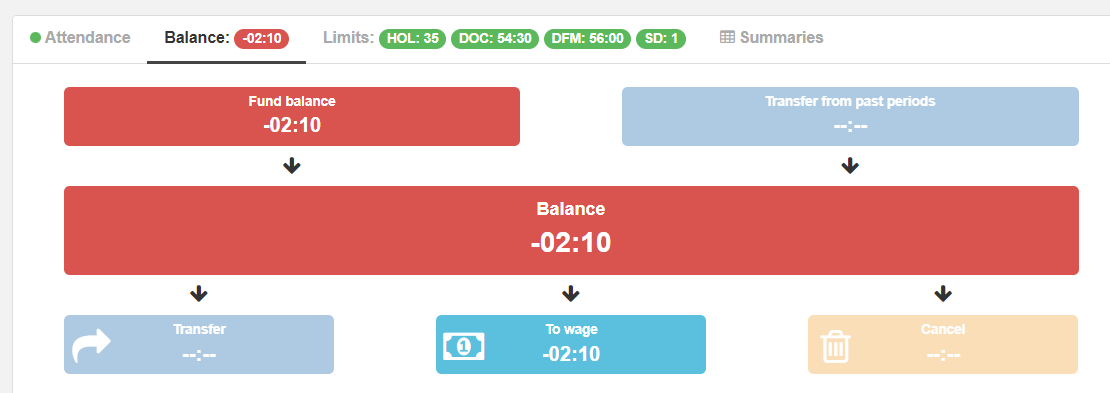
 Actual balance - represents the +/- balance in the given set period
 Transfer from past periods - represents the transfer /- balance from the past
 Balance - total balance status for the given period
 By clicking on it, we adjust the balance and determine how much of the balance should be transferred to the following period:
- By clicking on icon
 we work with the total daily balance and adjust it:
Example: The first box "modified" is used to change the balance value - i.e. we will modify the original 71:11 hours to 30 hours. The box "transfer" is used to add hours to be transferred to the next month, e.g. 10 hours, of which 20 hours go into wages.
If the balance is positive, the window is lit green: 
If we adjust the balance to minus - press minus and the window will be lit in red: 
If the entire difference between the adjusted and transferred balance is not to be transferred to wage, but for example only 10 hours, you must mark the option at the top right "Cancel part of the balance" and in the transfer to wage you must write 10:00 a.m. The table will then look like this:
The yellow marking of 10:00 means that the system will cancel (forget, throw away) 10 hours.
- By unmarking simple mode, we adjust the balance for individual types of days (working days, Saturdays, Sundays, holidays):
We adjust the balances in the same way as in the simple mode. The same applies to the mode to cancel part of the balance:
 Defining how much of the balance is transferred to wages
Click to get to the table, which you can edit analogously (description above).
 Cancellation of balance
Click to get to the table, which you can edit analogously (description above).
Note
You just need to edit the balance in one of the tables, you don't need to edit each one. The resulting effect is clear and visible in the original balance chart:
Pen icon indicates that the original balance has been adjusted.
# Request for a break
The break request functionality is intended for those types of breaks that are approved by the relevant authority. It goes, for example about approving leave requests or business trip requests by superiors. Hierarchy scheme for approval of break requests (example):
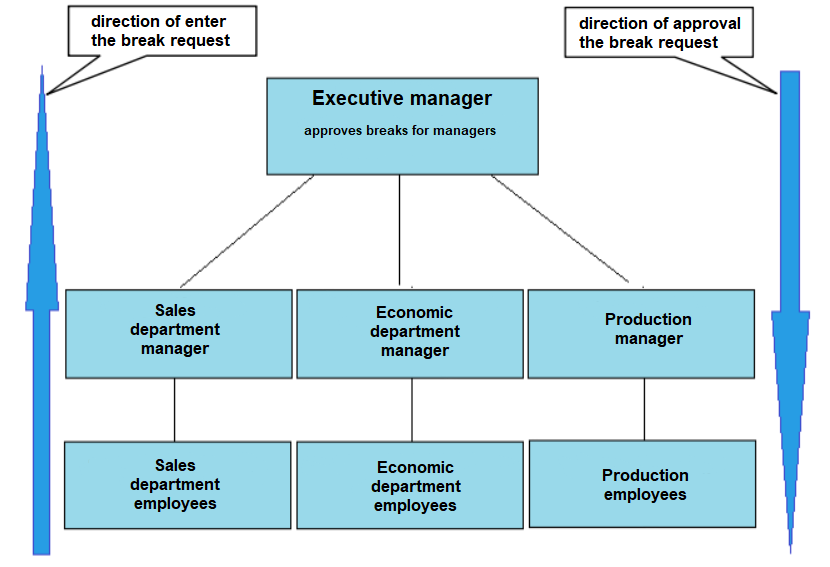
Two important terms are added in this state:
- Applicant for break - is an employee who requests the relevant authority (superior) to approve a break (eg vacation, business trip, etc.)
- Approver of break - is the relevant authority (foreman, leader, executive, etc.) who approves the request for break.
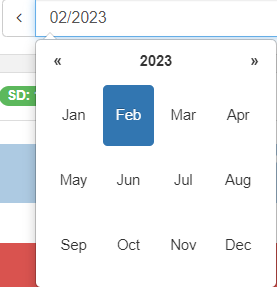
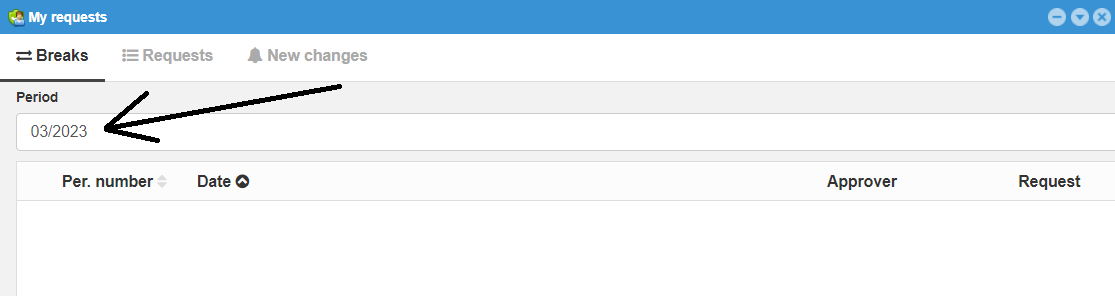
Entering a break request Before we enter the break request, we need to change the period in the main screen of the employee's attendance. For example, the current attendance period is March. If we want to submit a request for April, we need to change the period in the upper right corner of the screen to April.
The break request can be found in the employee's main attendance screen
Note
If the break is a whole day, we do not fill in the day and time in the line below. If the break goes past midnight (e.g. I am applying for a private pass and I have to be on the night shift, then I am applying for leave from 10:00 p.m. on the first day - I will mark it as 0 and until 6:00 a.m. on the second day, which I will mark as 1)
 - We will add to the list of requests for approval.
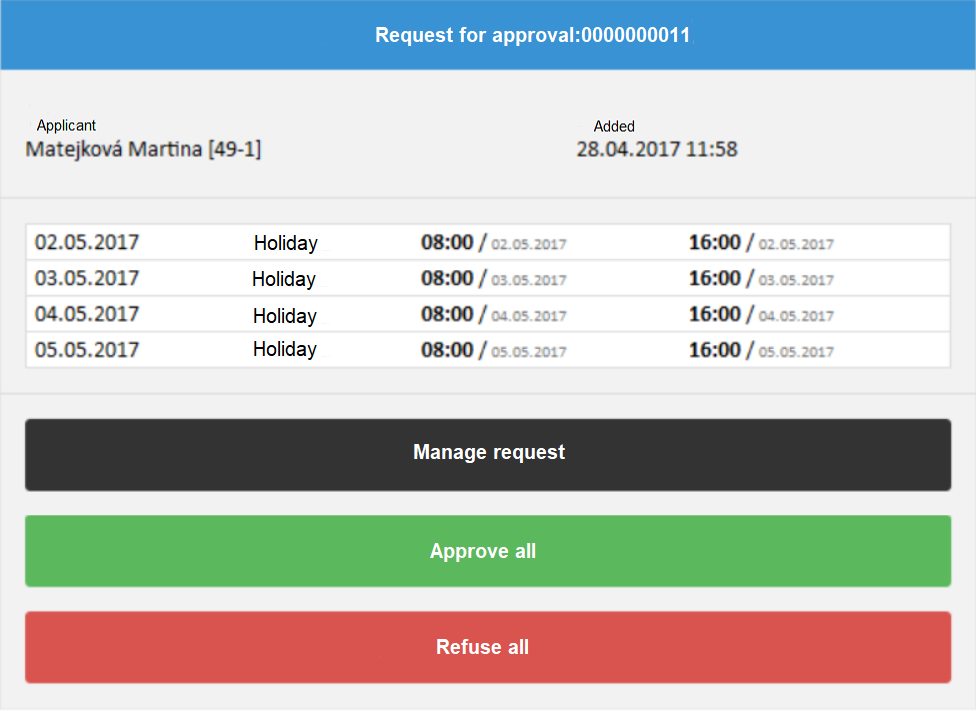
# Submitting a request for approval:
Application submission procedure:
-
We select the approver by choosing from menu
-
Note is not required. It is possible to give a reason.
-
All the days for which we created the request will appear in the window below the note.
-
We will check the days. If we decide not to send a day, we mark it and delete it
-
We will send the other days that are visible in the window to the approver
-
The approver will receive a request for approval by e-mail.
-
The list of breaks, approved requests and changes can be found in the main screen of SW webVisitor under the name "My requests".

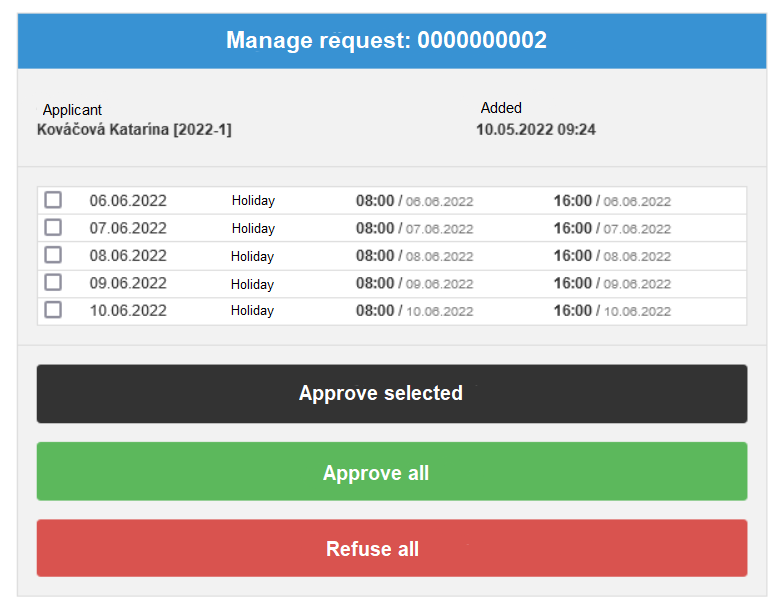
# Approve the break request
The mentioned functionality is accessible only to a person with the authority of the approver.
- The request is sent to the approver directly by e-mail.

Options will appear in the message:
The approver approves or rejects the request by clicking away. In the case of the option - Manage request, the approver will be taken to a menu where he can specifically select only certain days to approve:
The approver can also manage requests directly in webVisitor under the icon
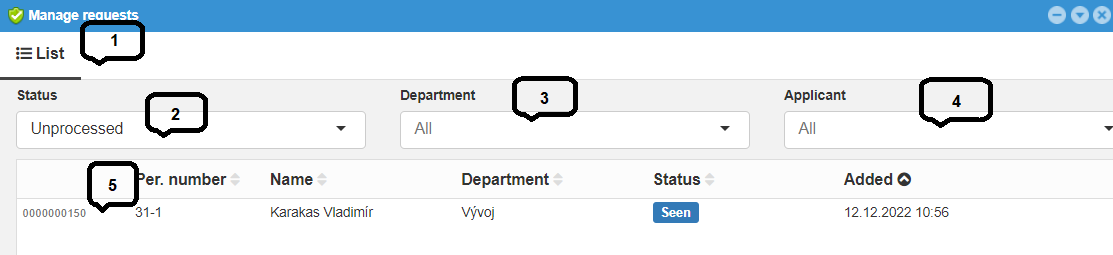
- List and number of applications
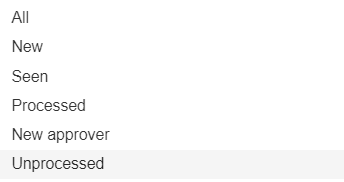
- Filter for requests:
- Filter for selection from departmens
- Filter for selection from applicants
- Request number and status
# My requests
After processing the suspension request by the approver, the system generates an e-mail notifying the applicant of the status of his request:
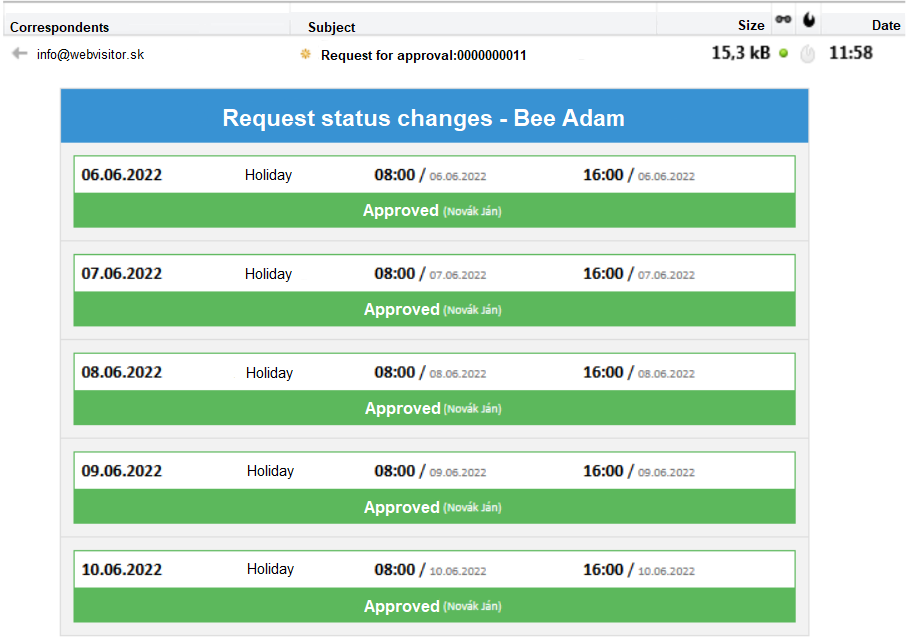
The applicant manages requests for breaks in the section „My requests.
- Overview of breaks for the selected period (e.g. 05/2017):
 -approved break
 -rejected break
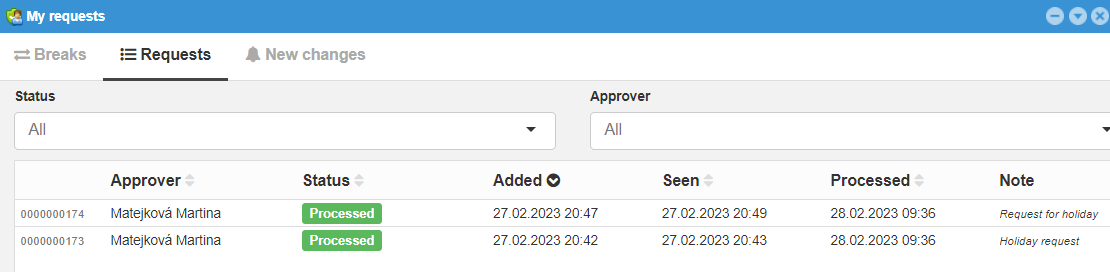
- Overview of created requests and their status:
- Overview of new changes:
