# Creating and assigning of a new work plan
If the assigned work plan does not suit the employee, it is possible to create a new one.
Warning
The procedure goes through only the necessary points when creating a new work mode. You can find more information about the configuration in the manual.
# Creating a work interval
The work interval is the shift that the employee is supposed to work on that given day.
- Open the webVisitor module and enter Settings
- In Common settings, go to the Work intervals tab
- Click on the
New intervalbutton - Enter Code, Name, for differentiation you can choose Color
- To save, click the
Savebutton
Note
The code is displayed in the work calendar as the designation of the given shift.
-
Double-clickto open the newly created work interval - Set the time Fund of the shift, if it qualifies for a lunch break, write its duration in Add to fund - Break. Fill in the times Accept from - to - outside these times, the time worked will not be counted (it will be trimmed)
- To save, click the
Savebutton - You can close the work intervals settings window
Warning
You can find more setting options in the manual.
# Creating a work mode
A work plan is generated according to the work mode settings.
- In the webVisitor settings, go to Group settings
- In the Work mode tab, click on the
New groupbutton - Enter Shortname, Name and save by clicking
Savebutton -
Double-click' to open the newly created work mode - In the Work intervals tab, click on the button `Add existing intervals', and select the ones you want to use *Go to the Planning tab and from the dropdown box select Way of planning work intervals - Generating by day type
- Click the
Pencilbutton and insert a pre-created work interval into each day - Save by clicking the
Savebutton - You can close the work mode settings window
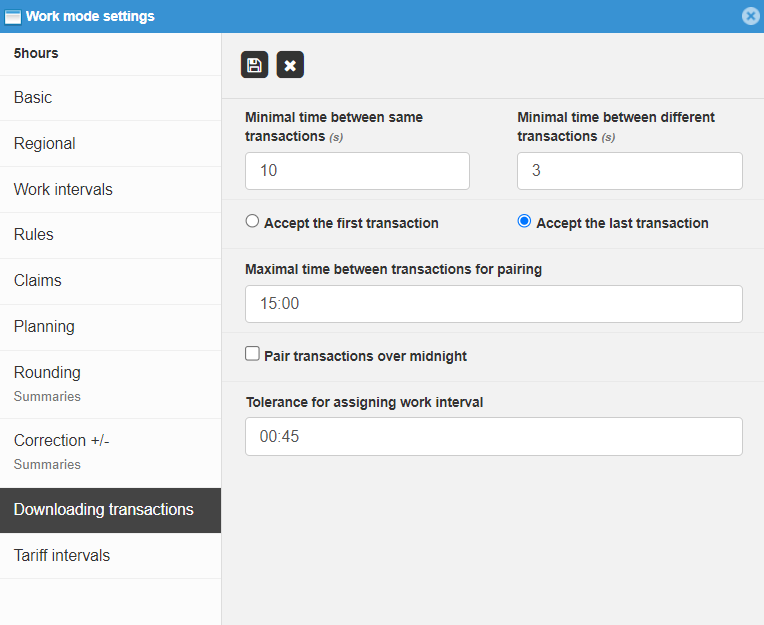
If the employee works night shifts or works past midnight, in the Downloading transactions tab, mark the option Pair transactions over midnight
Warning
You can find more options about setting different types of work mode (for example, Cyclic generation) in the manual.
# Assigning a work mode to an employee
You can assign the work mode to the entire company, to a specific department or to individual employees.
- In the webVisitor settings, go to Group settings
- Select the tab Employees
- Search and
double-clickto open the employee settings - In the Working mode field, set the required mode and save by clicking the
Savebutton - You can close the settings window
# Regenerating of the work plan
The employee's work plan is taken from the settings for the company or department. After assigning a new work mode, it is necessary to regenerate the previously generated months.

- In the webVisitor module, go to Employee Attendance
- Set yourself to the correct month, search and
double-clickto open the employee view - Go to the
Calendaricon and click onRegenerate plan - Select the period you want to regenerate and click the
Calendar - Regenerate planbutton
Note
The work plan is automatically generated one month in advance, therefore you select Period from the current month, Period to the following month.
Now the employee is assigned his own work plan.